| Latest topics | » Thanet Classics at Crampton Tower - Sunday 22nd April 2018 Fri Jan 12, 2018 2:14 am by Split-Lee» Thanet Classics Shows & Meets List 2018Fri Jan 12, 2018 2:13 am by Split-Lee» Thanet Classics November Monthly Meet - Tuesday 7th November Mon Oct 09, 2017 10:44 pm by Split-Lee» Lexus is200 wheels Tue Jun 27, 2017 7:14 am by Vintage jay » 1986 very original escort cabriolet for sale Tue Jun 27, 2017 7:03 am by Vintage jay » Classic Cars at Staple Country Fayre - Sunday 25th June 2017Tue Jun 20, 2017 7:14 am by MGT188 » Deal Car Show - Saturday 27th May 2017Wed Apr 26, 2017 3:15 am by Split-Lee» Thanet Classics May Monthly Meet 2017Wed Apr 26, 2017 3:13 am by Split-Lee» Thanet Classics on Margate Harbour Arm - Tuesday 16th May 2017Wed Apr 26, 2017 3:12 am by Split-Lee» Thanet Classics April Monthly Meet 2017Tue Mar 14, 2017 4:11 am by Split-Lee» Thanet Classics on Margate Harbour Arm - Tuesday 18th April 2017Tue Mar 14, 2017 4:10 am by Split-Lee» Crampton Tower Display - Sunday 23rd AprilTue Mar 14, 2017 4:08 am by Split-Lee» Thanet Classics Christmas Cruise - Sunday 11th December 2016Thu Nov 24, 2016 9:45 am by Split-Lee» In other news.... Another local meet up. Thu Nov 24, 2016 9:44 am by Split-Lee» The OhSoRetro Show 2017 - Sunday 24th SeptemberThu Nov 24, 2016 9:42 am by Split-Lee |
| | | Austin 12 New Ascot Project |  |
| | |
| Author | Message |
|---|
Austindox

Location : Margate
Cars : 1938 Austin 12/4 New Ascot
Posts : 54
Occupation : -
 |  Subject: Re: Austin 12 New Ascot Project Sun Aug 12, 2012 4:43 am Subject: Re: Austin 12 New Ascot Project Sun Aug 12, 2012 4:43 am | |
| Hi Lottie10 Good to hear from you too. I had seen your car on this website and was hoping I'd get the chance to catch up with you some time. It would be really great if you were able to come and see my car. We have been trying to decide on a suitable name for her for some time and my wife has come up with the perfect suggestion today. We are going to call her Audrey, after Audrey Hepburn. I have always been an enthusiastic amateur rather than being in the fortunate position of possessing any engineering skills. However,mi have had a deep interest in classic cars since I started in driving in the late 70's. I have always wanted to restore a prewar car and now I have the opportunity, I am determined that I will succeed. I am always short of time to do the work I want to do but I will get there eventually. I am finishing off the electrics to my workshop tomorrow (Sunday) so will be available all day if you wanted to pop round - I am in Margate. Alternatively, I shall be working on Audrey on Monday if you are available then. If you would like to come round then please email me your phone number on s.fennell@hotmail.co.uk and I will call you to arrange something. Kind regards Steve F. | |
|  | | Austindox
Location : Margate
Cars : 1938 Austin 12/4 New Ascot
Posts : 54
Occupation : -
| | Subject: Re: Austin 12 New Ascot Project Mon Aug 20, 2012 9:18 pm | |
| Hi I hope you are all enjoying the good weather and have been out and about in your cars. Mine is still a long way from being driven but I am doing what I have always wanted to do by restoring a pre-war car, so my time will come. My wife and I have christened the car Audrey after Audrey Hepburn as we feel it is a name that suits a car of this type and age. I have, at last, found time to get the rear axle painted up in chassis black and it looks superb, even if I do say so myself. What do you think? 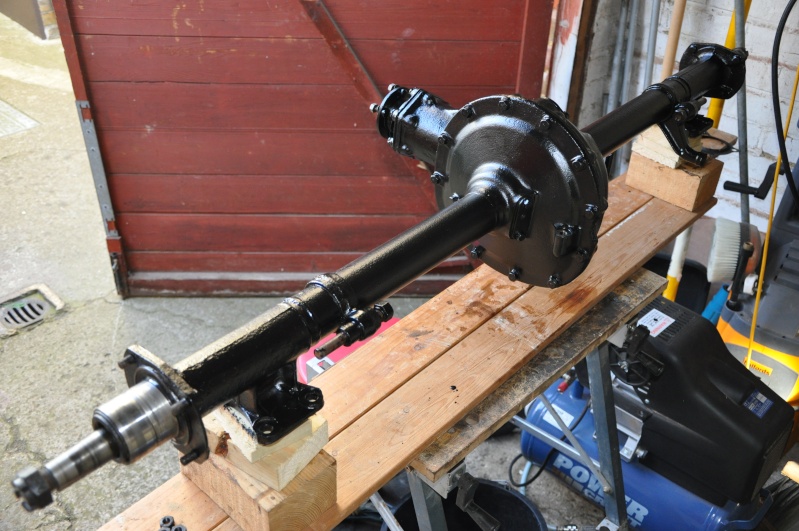 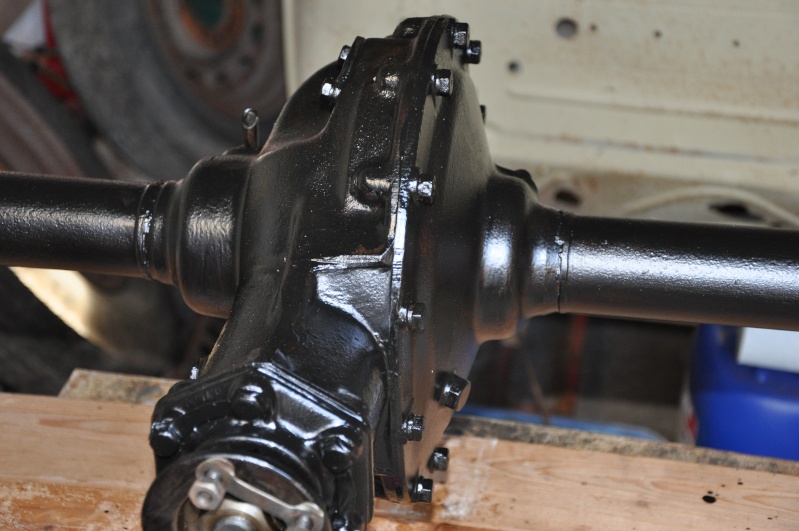 I wanted to start some reassembly so i needed to check a couple of points with the Austin Ten Drivers Club technical guru first. When I took the leaf spring off there was a plywood 'pad' separating the top of the leaf spring from the underside of the axle. 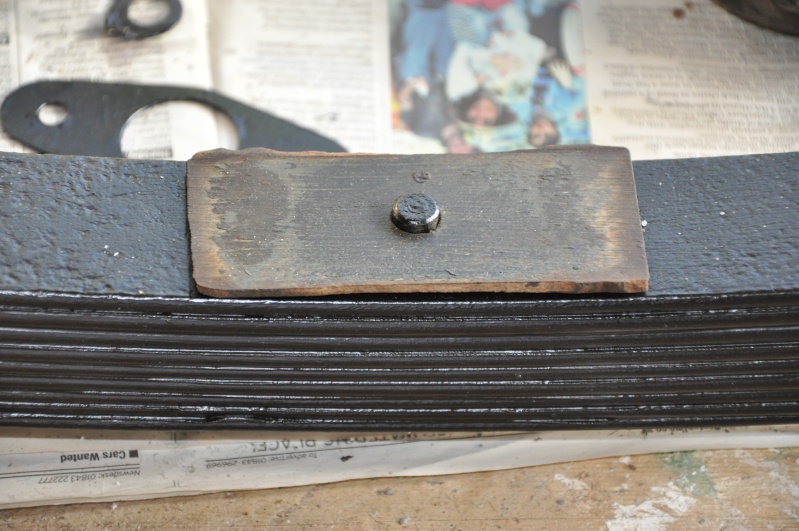 Apparently this is original and normal. However, he also stated that a better alternative was a neoprene pad, so I think it would be a sensible upgrade to do this. I am trying to keep as original as I can and I could put the timber back but I think there comes a point where alternatives don't compromise the finished product. i am going to try East Kent Trim at Worth to see if they can supply something suitable. I was also concerned about the shock absorbers originality as most of the books I have looked at show that they are of Luvax make with a more circular design. Mine are Armstrong lever arm dampers as below.  According to the technical advisor these are correct for the later cars like mine and therefore I am happy that they are original and also because they are in good serviceable condition I won't have to source replacements. I was therefore happy to go ahead with some reassembly and thought I would start with the new bushes into the drop link from the shock absorber to the axle mounting. What a job! It took me over three hours and a combination of cut down funnels, long bolts, washers, clutch alignment tool components and jubilee clips before i got the bushes in. You might be able to see from the pics below that they are going to be a tight fit - the old bush is the one on the right of the two and the new one is substantially fatter. Then came the next issue of trying to get the drop link onto the shock absorber pin. The recommended solution is to use a bullet and push that through with the pin directly behind it. Not having too many bullets laying around I had to saw the end off an old nail punch to make my own bullet shaped guide. This worked and you can see the result in the second picture. Still, no-one ever said this would be easy and its all about improvising adapting and hopefully overcoming.  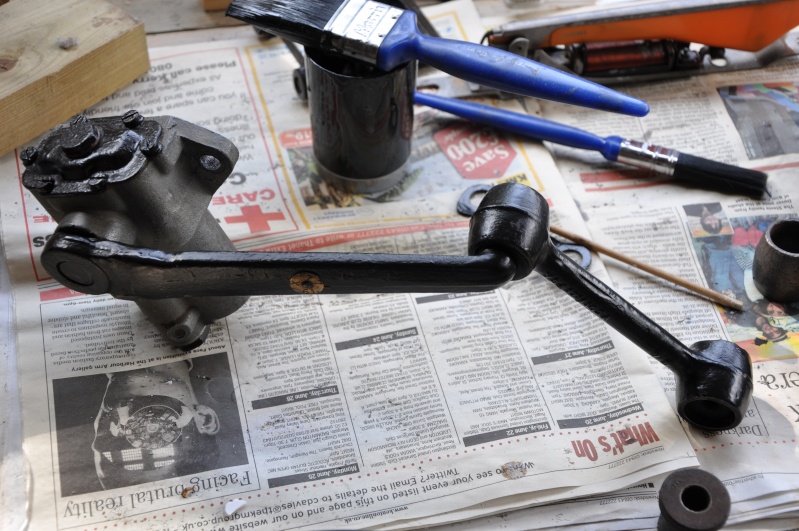 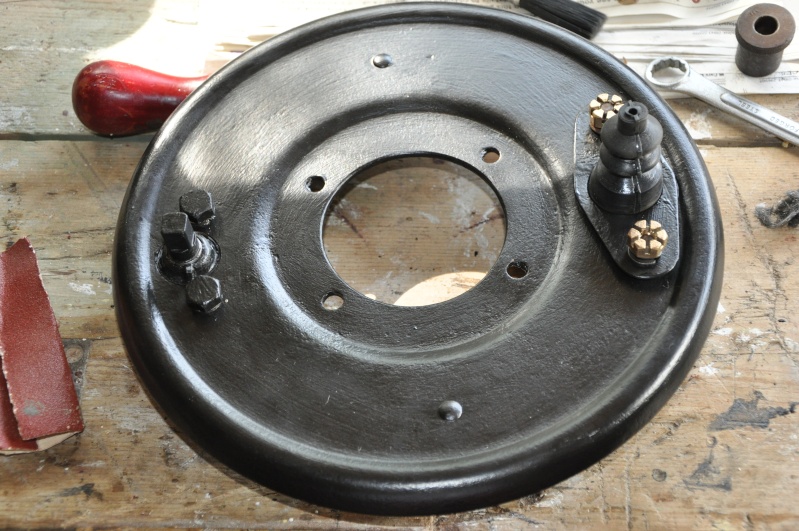 I just had time to start reassembling the brake back plate before I had to pack up for family duties, so although I didn't achieve what I wanted to, hopefully I have sorted the most difficult issue on this sub-assembly (don't tempt fate!). I am pleased with the way things are looking though and that some of the parts I was worried about seem to be original after all. Hopefully next time I will have more of it back together and can then start on the fuel tank. I am considering having the chassis blast cleaned to save time and ensure a thorough job, but I am still committed to using the chassis black rather than powder coating. I'll keep you informed in the next update. Kind regards as always Steve F. | |
| | | | Austindox
Location : Margate
Cars : 1938 Austin 12/4 New Ascot
Posts : 54
Occupation : -
| | Subject: Re: Austin 12 New Ascot Project Sat Aug 25, 2012 1:41 am | |
| Hi A bit more progress for you. I've cleaned up the petrol tank - outside at least - after emptying out some nice orange fuel that was left inside. Cleaning it was going well until I noticed a leak from moving the tank around. There is a split on one of the end seams and I remember when I took the chassis apart, seeing that the offside shock absorber was pinching this seam so it is no wonder really that it has split. 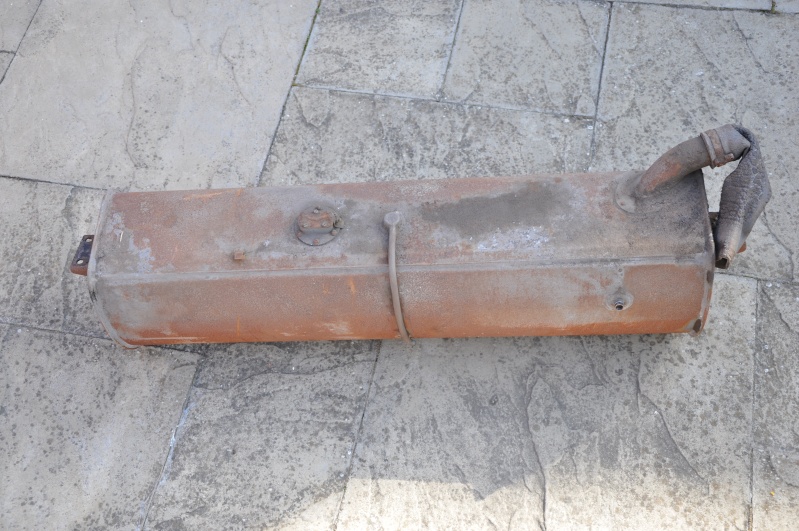  The plan is to use some tank cleaner and sealant produced by Rust Buster, the same company that produces the epoxy chassis black I am using then use their Tankguard epoxy paint on the outside of the tank. This will have to wait a while now as I have spoken to a guy at 3 Way Engineering in Margate who are happy to weld/braze the seam for me but I have to wash it out for a week with soapy water first. That seems to be the only bit of damage to the tank and hopefully everything else will go to plan with this. 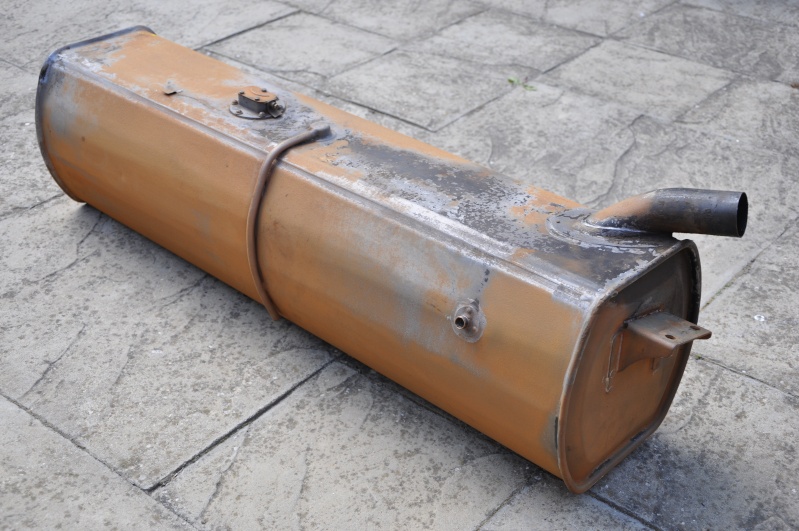 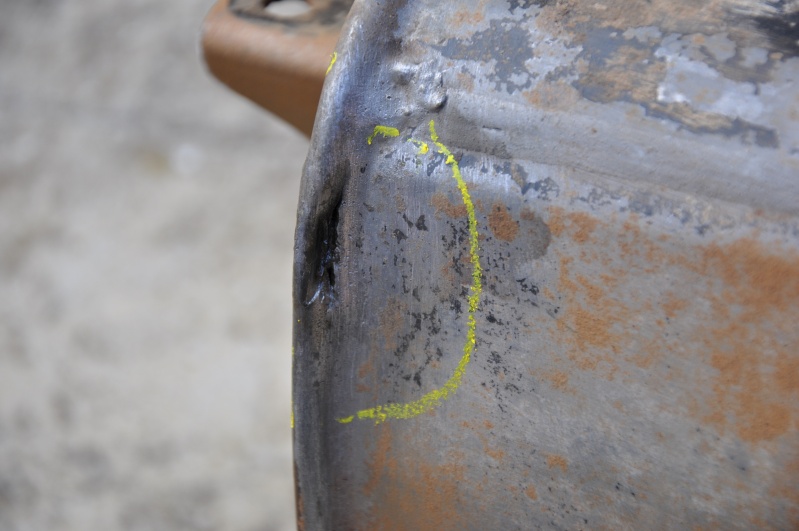 I'll let you know how the repair goes and then hopefully the tank will be done. Next update to follow soon. Regards Steve F. | |
| | | | HYM50W

Location : Westgate-on-sea
Cars : Austin mini 1963 and many many more!
Posts : 609
Occupation : Apprentice engineer
| | Subject: Re: Austin 12 New Ascot Project Sat Aug 25, 2012 3:29 am | |
| looking great! I made a machine for cleaning out my mini fuel tank, It will be interesting to see how the cleaner and sealer products do.
It still amazes me how you can re use nearly every original part for the car! | |
| | | | Austindox
Location : Margate
Cars : 1938 Austin 12/4 New Ascot
Posts : 54
Occupation : -
| | Subject: Re: Austin 12 New Ascot Project Sat Aug 25, 2012 4:06 am | |
| Tom
I'm sure it won't last! Got To try my hand at relining brake shoes soon!
Steve F. | |
| | | | Austindox
Location : Margate
Cars : 1938 Austin 12/4 New Ascot
Posts : 54
Occupation : -
| | Subject: Re: Austin 12 New Ascot Project Mon Oct 15, 2012 12:56 am | |
| Hi Its been a while since my last entry on this forum. Time just seems to gallop past but, unfortunately, it hasn't all been spent on the Austin! Anyway, the fuel tank came back from the engineering shop suitably brazed and now, hopefully, leak free. The next stage was to use the Rustbuster products to clean the tank thoroughly inside then apply the internal sealant. To do this, the sender unit needed to be removed, presumably so it didn't get bunged up with the internal sealant. The 74 year old screws holding this in didn't all want to come out in one piece, two sheared off. One I managed to get out with a screw extractor but the other had to be drilled out. So, needing new bolts and with one whole to re-tap, I needed to find out what thread pattern and size the bolts were. If any of you haven't used T.V.Bond in High Street Ramsgate yet then you should. This fellow knows all there is to know about such things. He immediately recognised my bolts as 3B - of course they were! Unfortunately this is a difficult size to get hold of and, for once, he was unable to help me. I then went to BN Tools on Boundary Road, Ramsgate and got myself as 3BA tap - the one size I was missing of course. Again, the chap here is a minefield of information and tools. Be a shame when these places close. With holes re-tapped, new bolts ordered from internet and a replacement gasket cut out, I bench tested the sender unit coupled to the fuel gauge but couldn't get the fuel gauge to register. The rheostat in the sender unit seems to be working fine as a variable voltage can be read either side of the fuel gauge when the sender float is operated but no needle reading on the gauge. Seems like the gauge is not working. I think I will keep an eye out for a replacement unit on ebay as it will be cheaper than having the gauge professionally repaired. I have added a pic of the fuel tank now resplendent in its black outer coating which is another Rustbuster product called Tankguard  I have also been working on the propshaft which was another part covered in surface rust. I was unsure at first whether I wanted to replace the Hardy-Spicer U/J's but they looked quite rust encrusted although seemed to function okay. I decided that it would be best to do this while I had the chance and they were absolute pigs to get out. Clearly been in there since day one! However, the condition of the U/J itself wasn't at all bad although they were very dry and a couple of the caps disintegrated getting them out. You can see the before and after shots of the propshaft below and I am just waiting for the club spares dept to send through the replacements before that can be fitted up. The sliding joint at one end was also quite dry and that has now been freed up and loads of old, manky looking grease has been got out of the joint ready for a nice new refill. 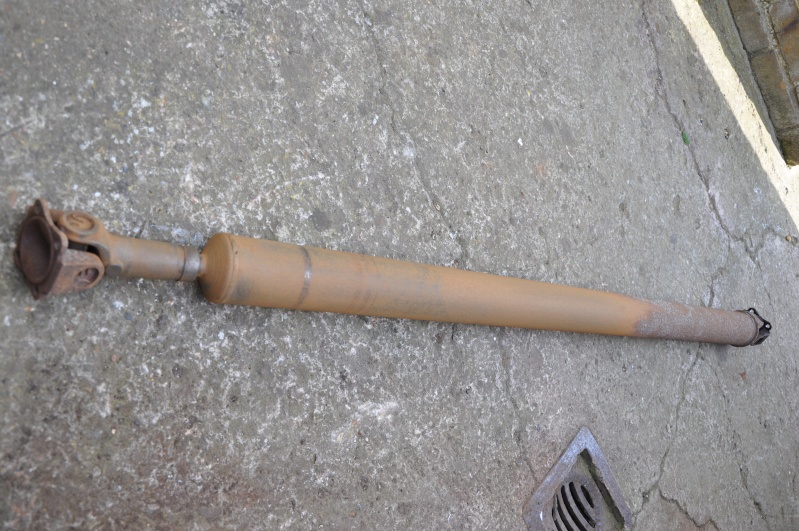 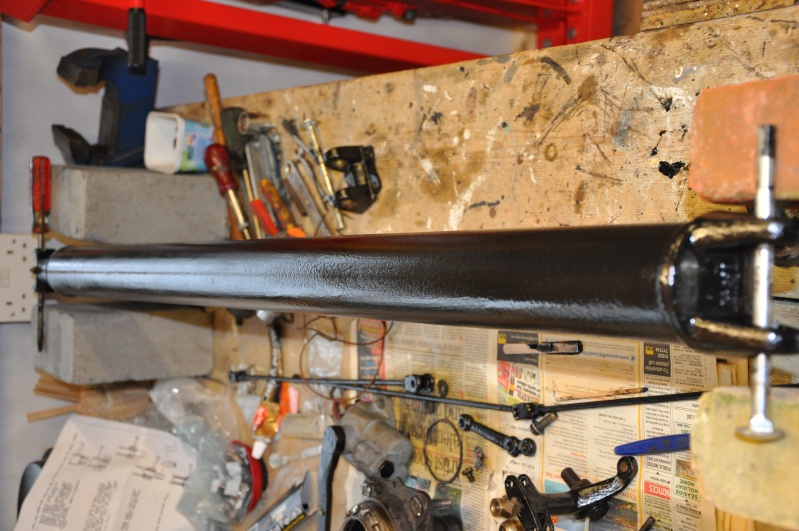 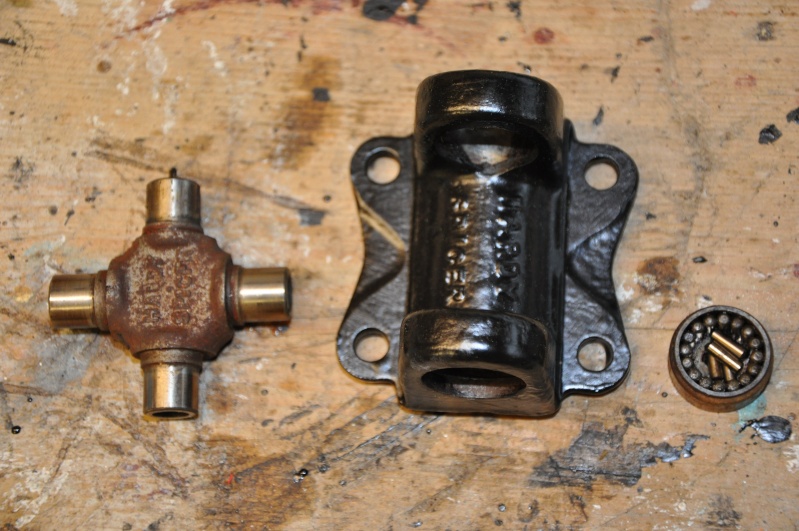 The Austins of this era were either 6 volt or 12 volt depending on the model. Mine is a 12 volt model which is achieved by coupling two 6 volt batteries housed in metal battery boxes fixed to the chassis directly beneath the two front seats. These boxes are in direct line of corrosion from road salts etc and also internally from stray battery deposits. Mine have obviously been repaired in the past as you can see below. The repair is quite strong and effective but it would have been nice if whoever had done it had removed the rusty, frilly metal that they were covering up with new metal. I decided that I could get away with just straightening up the rusty bits inside bringing them back to a solid edge. There are a couple of patches that need to be cut out and new metal let in but overall, once these issues are addressed, I can dress the welds, clean up the surface rust, treat it with Dinitrol Rust Converter and paint them with chassis black. Doesn't look that great at the moment but they will be fine once they are done. 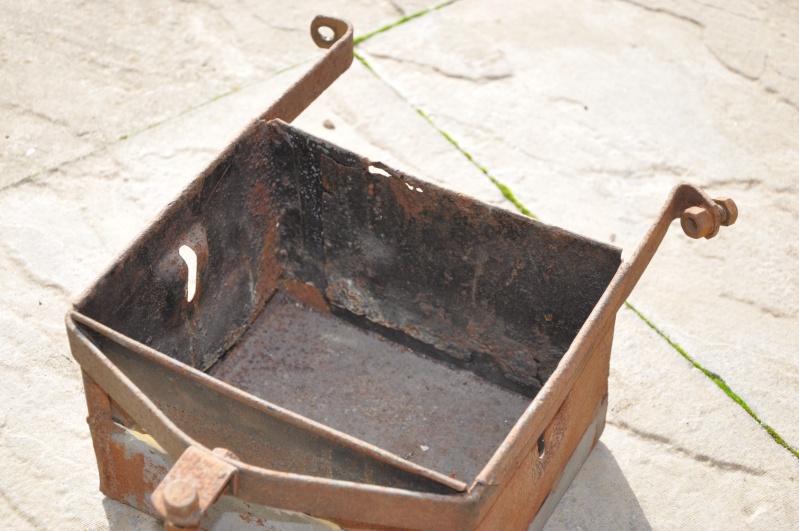 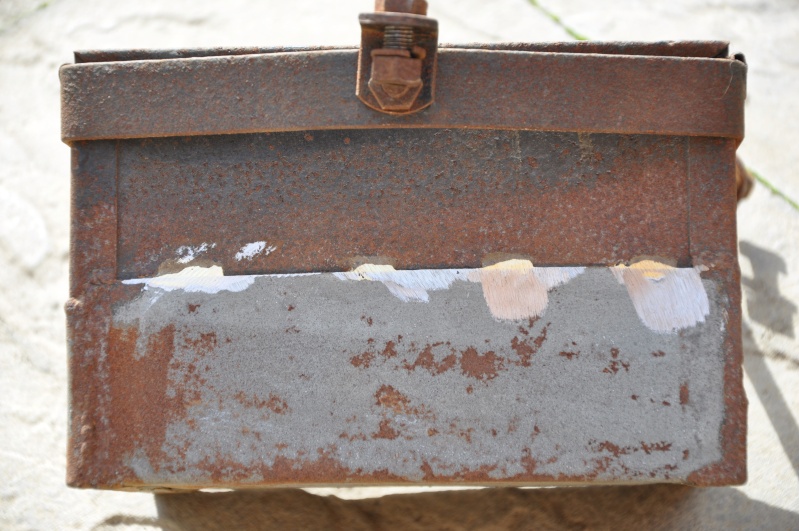  Otherwise, not much else has been happening recently. I am hoping to start getting this back axle back together but have been held up getting the right parts to put all the braking system back together. It is a Girling rod system which is linked by clevis pins and oiled felts. The trouble with these cars is that Austin often raided the parts bin for some of their models andf it is difficult to get the right bits based on the model you have. Measurements need to be taken and compared against new parts to ensure a correct replacement is obtained. At the moment my new clevis pin set has been returned for a different one along with two rear hub seals which are far too small for my car. This is down to me learning a valuable lesson in checking everything before ordering. Hopefully they will be able to supply me with what I need to start getting this part of the car back together. I am reluctant to start ion the front end at the moment until this end is back together. Anyway, I'll keep you posted and hope to do so a bit more regularly than recently. Kind regards Steve F. | |
| | | | Austindox
Location : Margate
Cars : 1938 Austin 12/4 New Ascot
Posts : 54
Occupation : -
| | Subject: Re: Austin 12 New Ascot Project Tue Nov 06, 2012 2:39 am | |
| Hi all Whats been happening since my last update? Well, I've had my first bash at welding. Never even touched a welder before so i am quite pleased with my efforts on a battery box. i made a repair panel from an old socket set box and folded over the top edge to match the box design. I then welded in the two edges but haven't quite worked up the confidence to run the butt weld along the join. In hindsight a lap weld would probably have been better. Anyway, I'm quite pleased with the job. 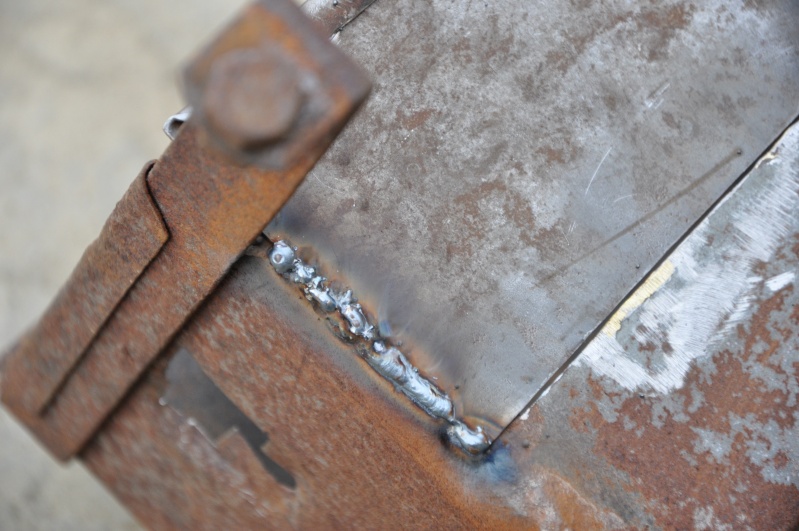 The two battery boxes go beneath the front seats and should have 'factory' covers over them but these were missing on my car. Many other cars have had wooden covers made up as they also had lost their originals. On e-bay the other day a pair of covers plus battery boxes appeared which i have been lucky enough to win for a very reasonable sum. I shall, therefore wait until these arrive to see whether I will fit the ones I have got or the two that i get with the covers. I have also managed to finish off the propshaft having got a couple of new Hardy-Spicer UJ's, which proved to be a bit of a pain to get in but all done now. The propshaft has now been put to one side to await its later refit to the axle and gearbox. 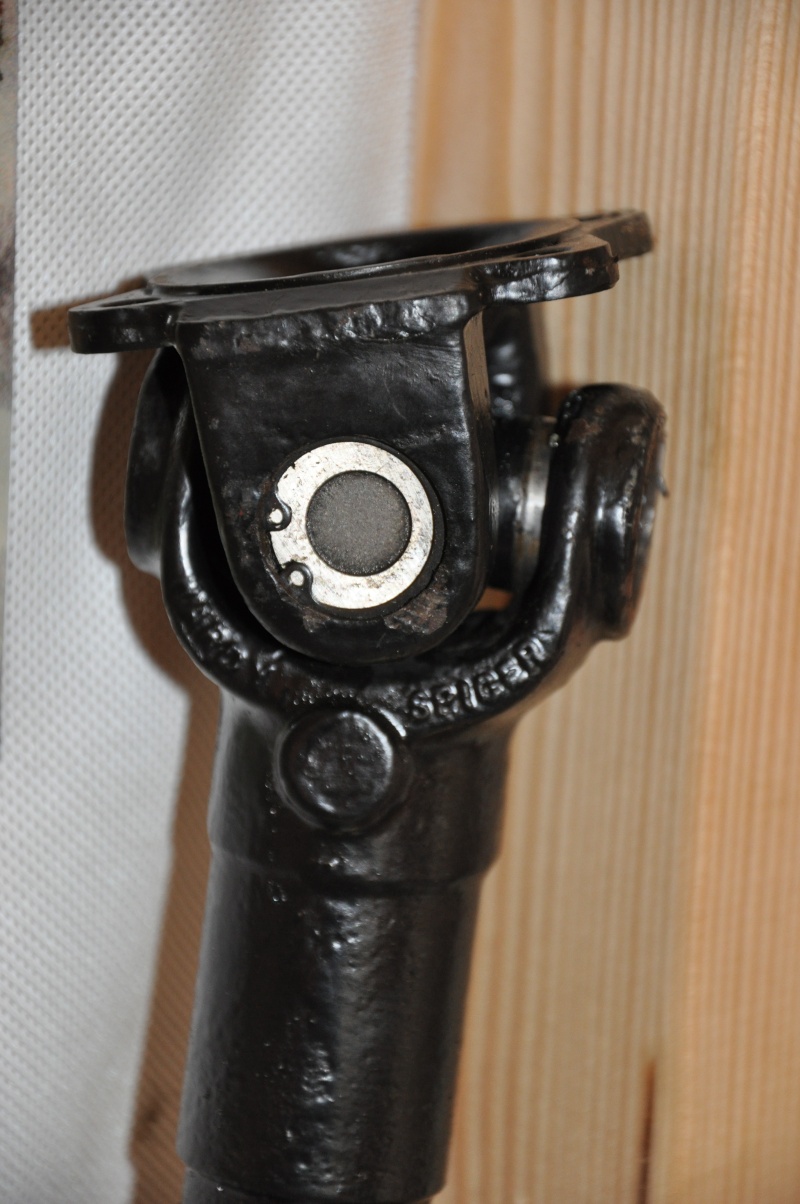 I have also rebuilt the rear brakes which introduced me to another new job - relining brake shoes. The copper rivets provided sit in the rebated shoe and I used an old clevis pin in a vice as an anvil to make sure the head of the rivet was fully home before peening over the other end of the rivet. The brake rods were then reassembled using new clevis pins and oiled felts. It doesn't seem to matter how many pictures you take, when you come to try and reassemble something you could always do with just one other picture to illustrate how it went together. I got there in the end though with a mixture of logic, various photos, diagrams and good fortune. The brakes are a Girling system and are very simple in design. Basically the rod pulls on a cone which pushes out the two brake plungers to expand the brake shoes onto the drums. There are two small steel 'wheels' between the cone and the plungers to make this movement more efficient. At the other end is a standard adjuster set up. The system is protected from the rear by a rubber bellows and a cantilever system is used to transfer the longitudinal movement of the main brake rod into lateral movement across the rear of the car. The system was pretty seized up when i got the car and it is very satisfying to operate the system now and see it work properly. Obviously it will need adjusting when back on the car though.  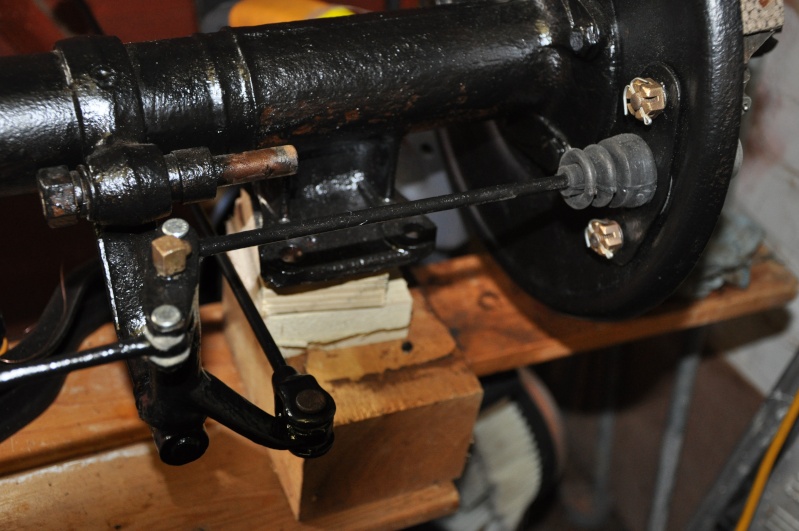 Next job is to rebuild the rear hubs with new seals and replace these on the half-shafts. I had a bit of a problem finding the right seals to fit my car but a company called Obsolete Oil Seals ( www.obsoleteoilseals.co.uk/ ) came up trumps and were very helpful. These seals fit into a huge castellated nut in the rear of the hub and the leather lip seals against the axle casing. I am soaking the seals in oil at this time to ensure they have sufficient flexibility and sealing characteristics when they go on.  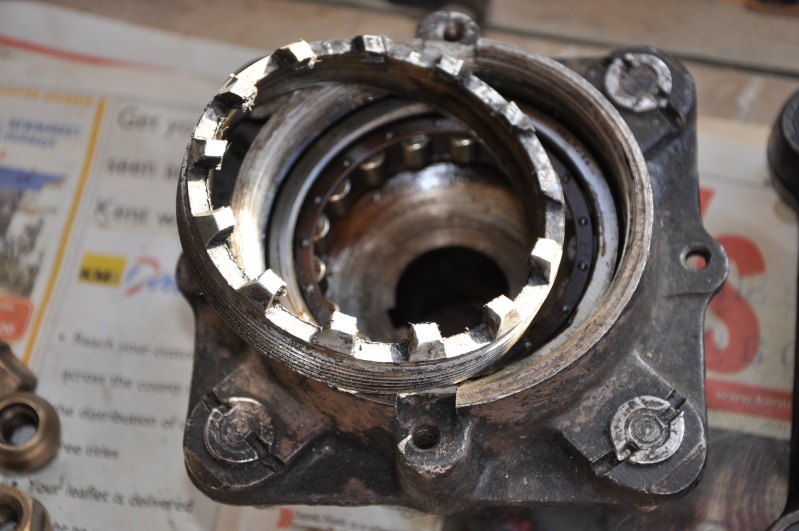 When I have fitted the hubs I can get the drums back on and I will refit the leaf springs and two wheels to the axle to allow me to move it about for storage purposes. The only bit I won't be able to put back together at this time is the rear shock absorbers. I thought these were okay and just needed cleaning up, refilling with shock oil and new fibre sealing washers. However, one of them has started to weep fluid from the casing around the rotating spindle on which the arm is mounted. I am going to need to send these away for a rebuild. I have been in touch with a company called Stevson Motors ( www.stevsonmotors.co.uk/) who rebuild these, and they are likely to cost about £50 a side but that will give me two guaranteed units so I suppose its not too bad. That'll do for now I'll give you another update soon when the back axle should be complete and hopefully I will have made a start on the front end. Kind regards Steve F. | |
| | | | Austindox
Location : Margate
Cars : 1938 Austin 12/4 New Ascot
Posts : 54
Occupation : -
| | Subject: Re: Austin 12 New Ascot Project Sun Nov 18, 2012 5:57 am | |
| Hi all Well, the rear axle is pretty much all back together now, just waiting for the two rear shocks and drop links to be returned from their overhaul by Stevson Motors, Birmingham. They called to say that the units were in very good condition for their age and just needed a service. The leak was caused by a core plug that hadn't been fitted too well. In the meantime I have been busy dismantling the handbrake and footbrake assemblies from the chassis as I work forwards towards the front axle. 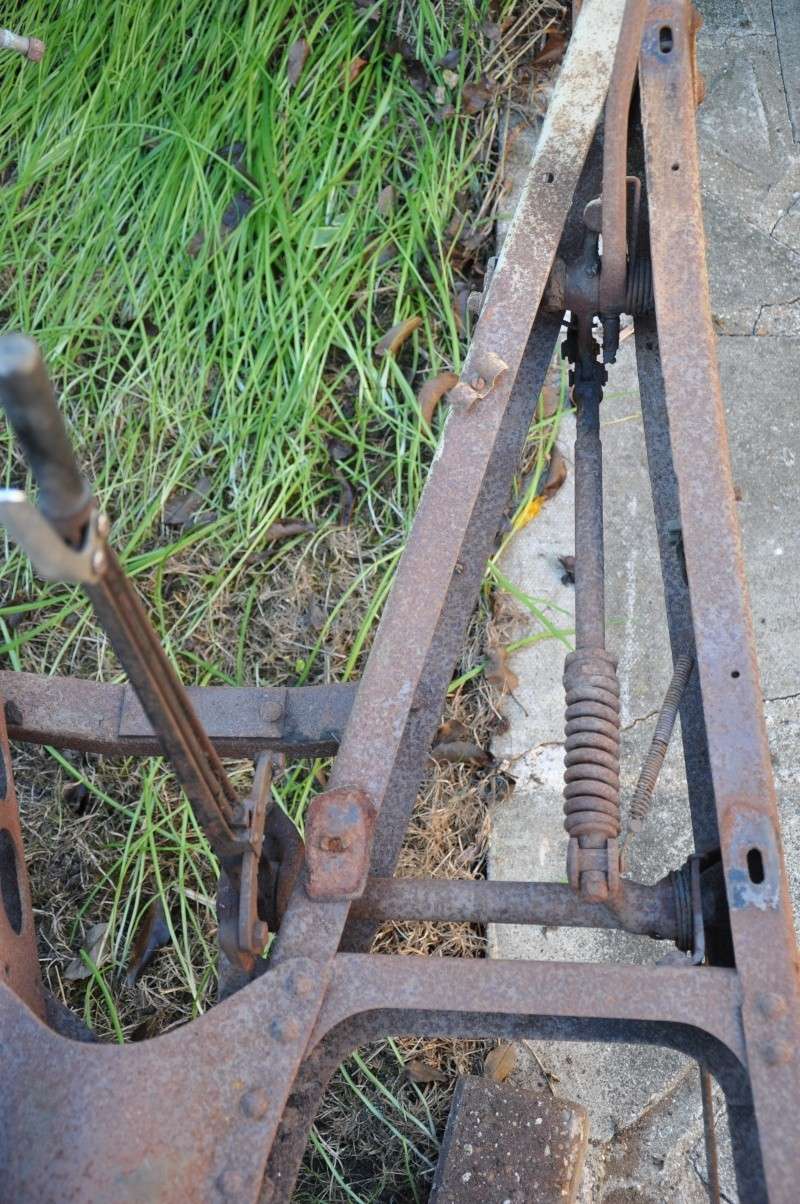 As you can see the handbrake is a vertically mounted unit fitted to a cross shaft in the chassis. It is also linked to the footbrake mechanism and a further link to the primitive Lucas Brake Light Switch 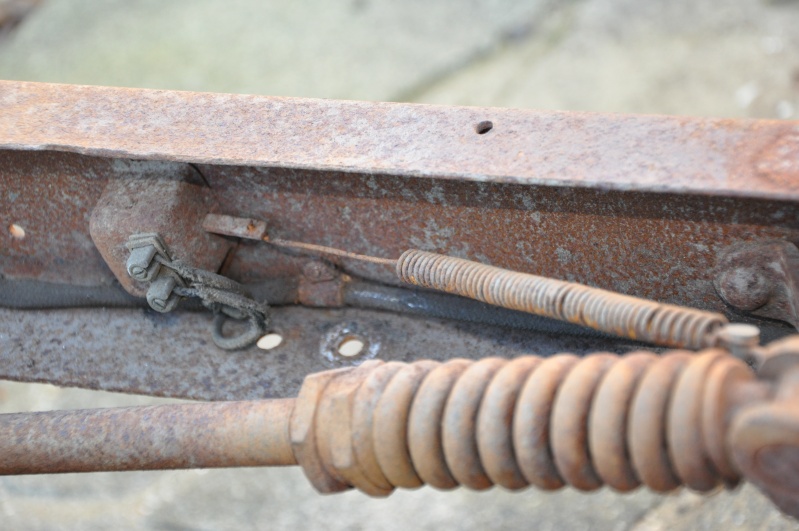 The large spring is a device fitted to these vehicles with the idea that it would reduce rear brake 'snatch' and make the whole braking process a bit smoother. I'll let you know how effective it is when I get the car on the road! Much of this part of the braking system is pretty seized up. Once I got the handbrake and footbrake mechanisms onto the bench I started work to reduce them to their component parts for a thorough clean up, paint and re-grease. Easier said than done!. Initially I had to grind off one of the handbrake mounting bolts that was well and truly rusted into position. This then needed drilling out of the casing that houses the end of the cross shaft. I had to use heat quite extensively to get some of the nuts undone and, unfortunately, the adjustable yoke on the end of the long brake rod running from the handbrake to the rear axle sheared off when I tried to release it. It needed to be free to enable proper brake adjustment when the system was complete. I will need to get one of these rods turned up and threaded at a machine shop as they cannot be replaced off the shelf.  The plan is to get this part of the braking system refurbished then take the front axle from the car to start on that. This will probably involve King Pin replacement and all sorts of other exciting challenges! The front axle looks a bit sad at the moment with its fairly liberal coating of surface rust and it will be good to get it into the dry for the winter. The chassis will have to stay outside under a sheet of damp-proof membrane until the Spring, when I hope to get that refurbished and refit the axle assemblies etc that I am currently working on. The rolling chassis can then be promoted to the garage and the body will have to come outside for work. 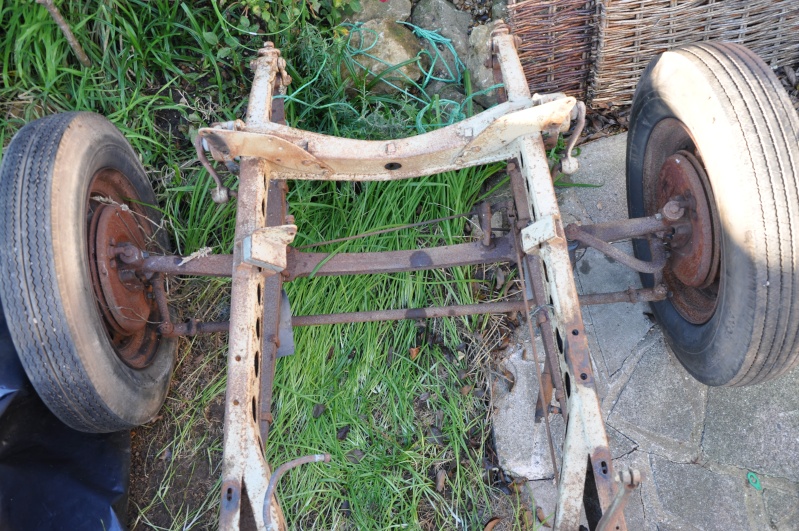 I have also been fiddling around with some minor pieces of interior trim to keep the momentum going. When I got the car there was no rear view mirror but I managed to find a cosmetically challenged one at Beaulieu this autumn for £10. I have just finished refurbishing this. I was going to get the original glass resilvered but this is expensive. Instead I had Ramsgate Glass cut one from the original as a pattern. Yes it is very slightly thinner but it only cost me £4. I have had to paint the back of the new mirror satin black as the mirror glass they cut for me had a bright green finish on the reverse, but I am pleased with the overall result and i still have the original glass which can be resilvered if it ever bothers me that much. 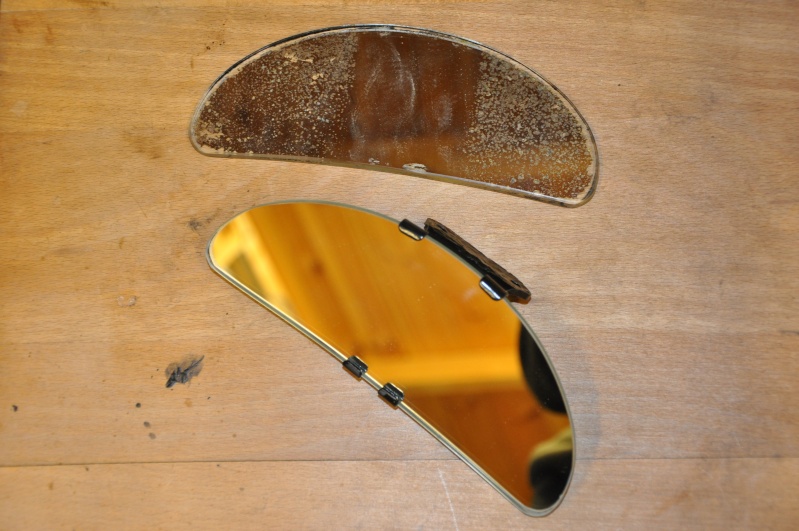  Ok. That'll do for now. I'll post another update soon when hopefully the handbrake assembly will be painted and looking a bit more like it should and maybe the front axle will be off the chassis. Kind regards Steve F. | |
| | | | Hatch DLM

Location : Tiptree
Cars : DLM 1 & my daily DLM 1
Posts : 1264
Occupation : Retired HGV 1 driver, Now full time layabout
| | Subject: Re: Austin 12 New Ascot Project Sun Nov 18, 2012 8:12 am | |
| Steve
When you do cover everything outside for the winter try to raise it off the ground enough so you can leave an airflow, and try to rig it up to keep the outer cover off the metalwork.
It worked with the DLM, and that was under cover outside for 35 years, see the photos etc. in my rebuild thread. | |
| | | | Austindox
Location : Margate
Cars : 1938 Austin 12/4 New Ascot
Posts : 54
Occupation : -
| | Subject: Re: Austin 12 New Ascot Project Sun Nov 18, 2012 8:27 am | |
| Hi
Thanks for the tips. I've got it up on axle stands at the moment and the cover is loosely over it. I wish I had somewhere to keep it out of the weather but when you split a car down into its parts it takes up a heck of a lot more room than the whole thing! I will have to put it in the garage as a rolling chassis when it is complete and work on e body outside. Shame but not much choice.
Kind regards
Steve F. | |
| | | | Split-Lee
Admin

Location : Margate
Cars : 1962 Splitscreen VW Camper, 1983 VW Polo
Posts : 4543
Occupation : Doing as little as possible.
| | Subject: Re: Austin 12 New Ascot Project Wed Jan 09, 2013 9:14 am | |
| Any updates on this Steve??
~Lee | |
| | | | Austindox
Location : Margate
Cars : 1938 Austin 12/4 New Ascot
Posts : 54
Occupation : -
| | Subject: Re: Austin 12 New Ascot Project Fri Jan 11, 2013 3:42 am | |
| Hi Lee and everyone else Happy New Year to you all. I'm sorry I haven't posted an update recently but I have been a bit unwell and haven't done much on the Austin. However, I have made some progress and also had some issues to deal with! Firstly the spare battery boxes and 'factory' lids arrived safely and I am in the process of cleaning the lids up for painting. I have no idea what they put on them but it is a sod to get off! There's a picture below of them as they arrived and they are now part stripped waiting for me to have renewed energy to take a flap-disc to them to get them cleaned up.  When I left the last update, I had a problem with the main brake road which is meant to be adjustable. in trying to free off the adjustable yoke, the road sheared and I had to get a new one turned up at a local machine shop. This was done for £20 and in slightly thicker gauge steel rod than the original as that was the nearest size the machine shop had. It is not critical as it doesn't need to pass through any tight apertures. You can see the new rod and original adjustable yoke below. 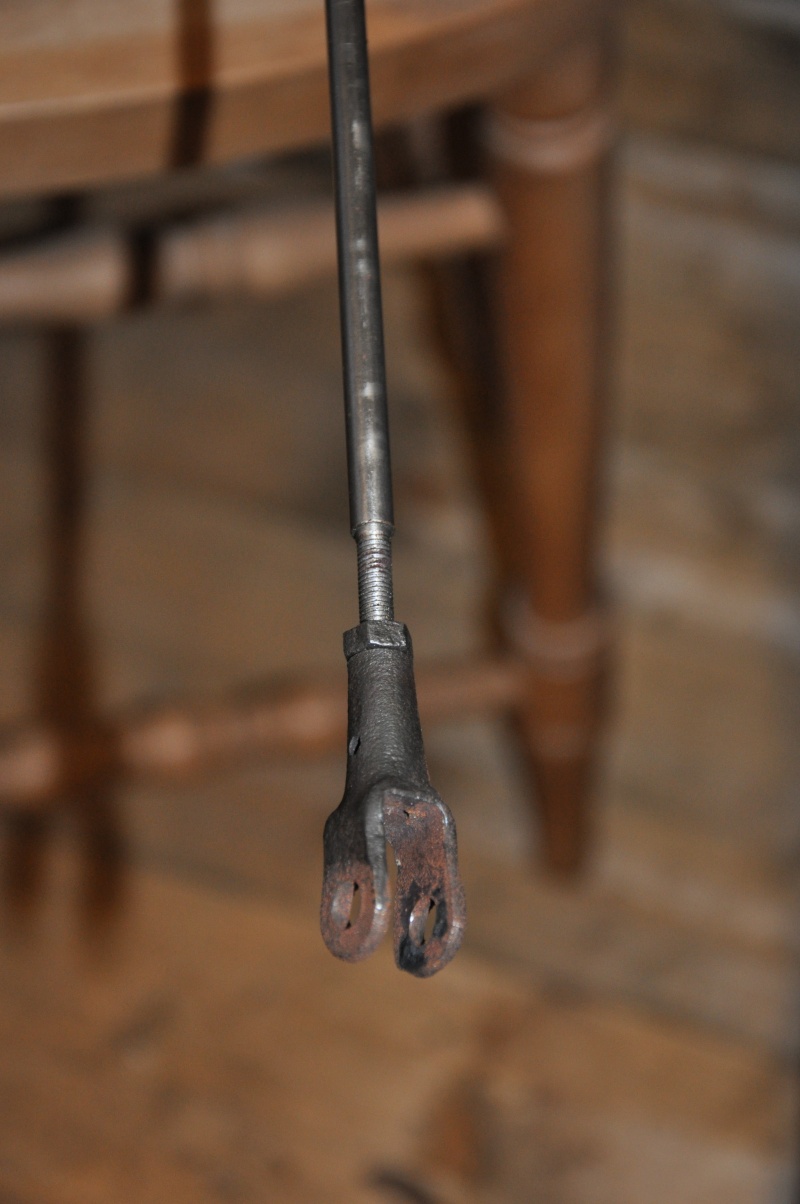 I then had a bit of a problem with the handbrake mechanism. Its a bit hard to explain in words but hopefully the pics will help. The handbrake lever is fitted to a cross shaft which when it rotates pulls linearly on a large spring which is designed to reduce rear brake snatch. This spring is connected to the cross shaft by a trunnion which, to translate rotational movement into linear, must be free to rotate in its housing. The trunnion is the cylindrical bit with a hole in it in the first pic below. Mine was seized solid. I applied tons of WD40 and also tried heat but it wasn't coming free. Using the persuasive abilities of a ruddy great hammer and drift I eventually managed to get it to move. Filled with euphoria I clouted it harder and harder until it finally broke free. As you can see in the second pic I have now bent the yoke that it fitted into with the added bonus that it now won't fit back where it should go!! Great!! I have managed to reshape the yoke a bit but it still requires more work and ingenuity to get it back in line so I can refit the trunnion once it has been de-rusted, cleaned up, and well lubricated. Any suggestions gratefully received. Oh, the joys of restoration!!   I also left you last time with the news that i had sent off my rear shock absorbers for overhaul as despite feeling very solid they had developed a leak from the rear of the spindle. The company I used was Stevson Motors in Birmingham. They assessed the dampers as being in pretty good health just needing a service. the leak was from a weeping core plug poorly fitted. Unfortunately, having not received the dampers back from Stevsons, I called them to find out what was happening and they told me they couldn't find them. This was a week or so before Christmas. I was naturally delighted! Especially as, at their request,. I had also sent up my newly rebushed drop-links and axle pins as they said they would refit those for me at the same time. I left things until after Christmas and then e-mailed them to see if they had found them and I got a phone call back explaining what had happened and that they had located them. apparently I had been muddled up with someone else and they had been taken to the NEC in November thinking I was going to collect from there. Anyway, as you can see they are now back, fully refurbished and leak-free, ready to go back on the rear axle. 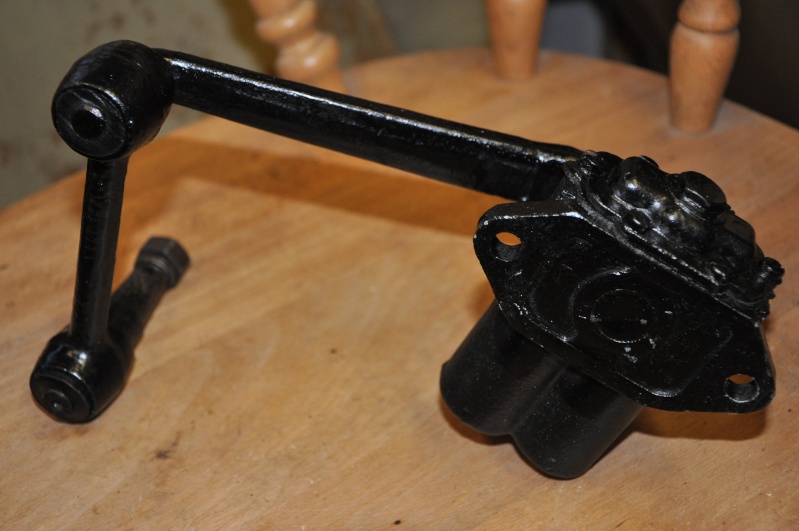 Thats about all that has been happening recently but I had a bit of a different present from the good lady wife for Christmas. A 4 feet high advertising hoarding of the 1970's (?) Esso man. This will need some bracketry rigging up so that I can have it on the back of my workshop door. 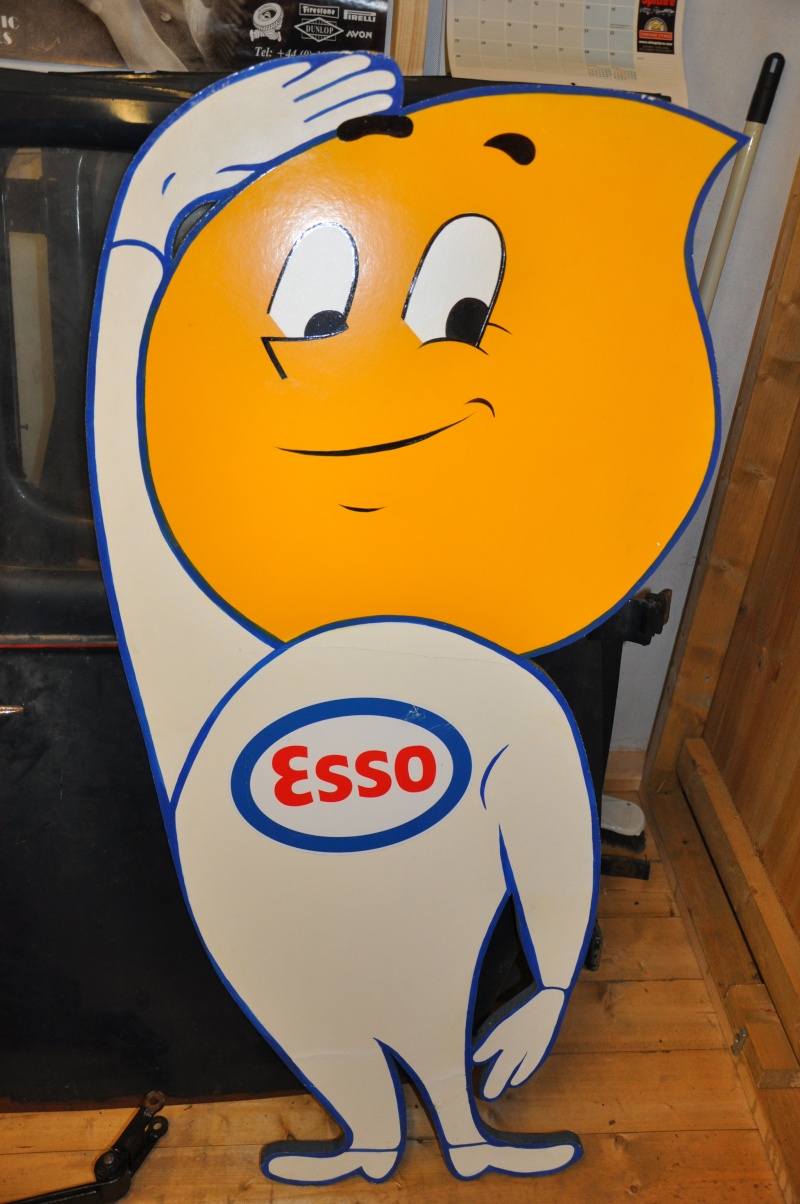 That's all for now. I will hopefully get back out in the workshop soon but I've got a busy time with work at the moment. I'll add another update as soon as I can. Kind regards Steve F. | |
| | | | Split-Lee
Admin
Location : Margate
Cars : 1962 Splitscreen VW Camper, 1983 VW Polo
Posts : 4543
Occupation : Doing as little as possible.
| | Subject: Re: Austin 12 New Ascot Project Fri Jan 11, 2013 5:13 am | |
| Brilliant update thanks for keeping us up to date!
Love the Esso man too!
~Lee | |
| | | | Hatch DLM
Location : Tiptree
Cars : DLM 1 & my daily DLM 1
Posts : 1264
Occupation : Retired HGV 1 driver, Now full time layabout
| | Subject: Re: Austin 12 New Ascot Project Fri Jan 11, 2013 7:27 am | |
| Just been reading through your posts again.
Top job, and your first weld is better than some trade ones I've seen | |
| | | | robbo86

Location : Margate
Cars : BMW E36 328i
Posts : 84
Occupation : Cowboy Millionaire Astronaut
| | Subject: Re: Austin 12 New Ascot Project Sun Jan 20, 2013 10:48 am | |
| Hi Steve, I've been at a bit of a loose end this evening so decided to touch base with the old forum again. It's been a good while since I was last on, but I went straight for your post to see how the old girl is progressing. Is it odd that I read the whole of your posts in your voice?
Give me a text if you need a spanner/tea monkey! | |
| | | | Austindox
Location : Margate
Cars : 1938 Austin 12/4 New Ascot
Posts : 54
Occupation : -
| | Subject: Re: Austin 12 New Ascot Project Wed Feb 27, 2013 6:13 am | |
| Hi Yet again, its been a while since my last update and I have been away for a few weeks too. However, I have been back out in the garage working on the old girl again (the car that is!). I have painted up the brake assemblies and the battery box lids, having spent some time cleaning off the horrible finish used by the last owners (see my last update and pic). Hopefully, you will agree that the new satin black finish is a bit more preferable to the pink artex or whatever it was that was on their before! they're not perfect but a whole lot better and I will probably need to fit some rubber or neoprene strips when re-assembling this part of the car to stop vibration against the floor.  I have also put the foot brake system back together and that, too, looks much better painted in chassis black. As usual I have shown a before and after pic to give you an idea of the progress made. The braking system at this point was very seized and has taken quite a bit of work to free up and make it functional again. I have also refurbished the brake light switch which is quite a primitive Lucas unit involving a long spring (new one needed!) connected to the footbrake mechanism which basically pulls the terminals together inside the switch. However, I have bench-tested this and it is absolutely fine, so in the spirit of originality I have painted it with chassis black and it will be refitted.   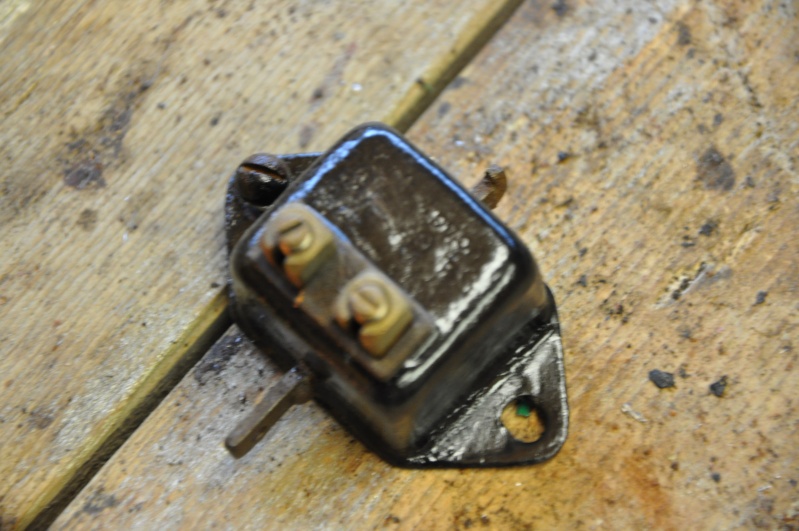 I've also been working on the D-lights which fit to the bumper mounting plate at the rear. I have blast cleaned one of these and I am quite pleased with the result as it should paint up OK. I will need to etch-prime first and probably use some primer filler as well just to take out some of the pitting that has developed over the years. These lights use a simple white-painted interior as their reflector and you can see the circular jole through which the number plate light shines. There should be a rubber shroud like the second light in the picture but mine have had it. The one here with the rubber shroud is one I recently found as part of a job lot of spares on e-bay. You cannot get these pieces of rubber any more but I have seen others made up from shock absorber bushes! Clearly some imagination and thought will need to go into these as the one I now have has gone hard and brittle. You can also see on the stripped lamp that the hinge pin is hanging out. It took a while to get it out but I needed to do so as it was broken. Just need to find something of a similar diameter to replace it now.  I have also started to take a look at the wheels. I was always intent on not using powder coating on the car, but I am thinking of having the wheels blasted and finished in black powder coating as the finish will be better than painted. The process should take out most of the light pitting caused by the surface rust. You can see that the tyres have had it! the side walls have so many cracks in them and although the tyres have inner tubes they would not be safe. The rubber has hardened as well and they are past their sell-by date. The tyres are 16" Goodyear crossplys and I don't really want to replace these just yet as they are too expensive to just be sitting around on a rolling chassis, so I think I will get the one wheel powder coated and see what i think. If I don't like it, it can be the spare (the tyre was flat anyway) If I do like it, I can use the four that are still inflated to keep the rolling chassis mobile then do them as a batch later on when I replace the tyres as well. 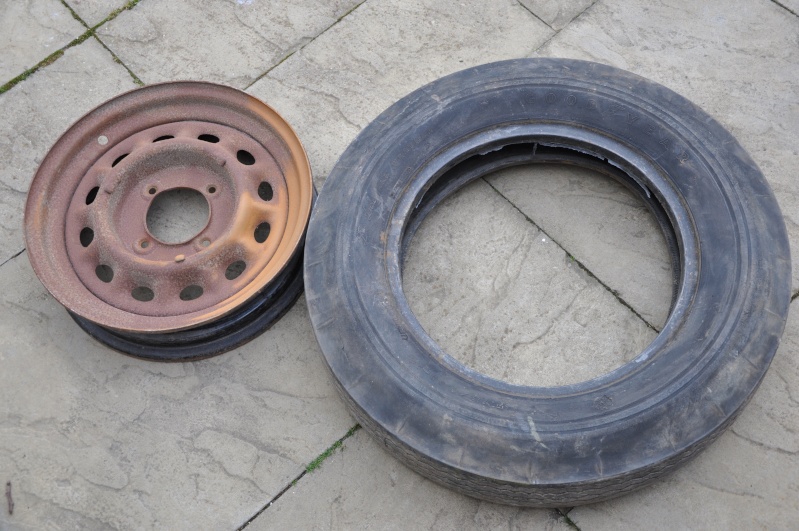 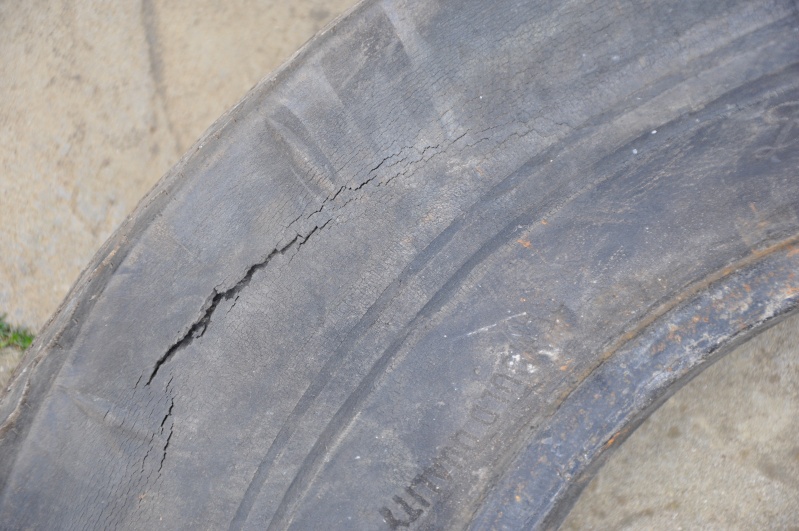 I have also managed to acquire another hard to find part that was missing - the fuel filler neck, which was another e-bay purchase. I am currently working on the handbrake which, as stated earlier, is painted up for reassembly but there are a couple of issues that need to be resolved before I can say it is finished. i'll save this for the next update, which hopefully will be done fairly soon. That's all for now folks. Kind regards Steve F. | |
| | | | Austindox
Location : Margate
Cars : 1938 Austin 12/4 New Ascot
Posts : 54
Occupation : -
| | Subject: Re: Austin 12 New Ascot Project Sat Mar 30, 2013 6:23 am | |
| Hi All Time for another update as I have decided I can't wait any longer for spring to arrive. Remember the handbrake cross-shaft that I had bent the yoke on slightly trying to get the trunnion out. Well, I have reshaped that now and the trunnion has freedom to move once again. i have reassembled the main cross shaft ready for re-fitting to the chassis once that is done. I will just need to get some new felts for the ends of the cross shaft. I have also been refurbishing the handbrake lever and mechanism and I am quite pleased with how that cleaned up. Just needed a new hairspring behind the chrome handle and a blob of grease on the ratchet mechanism. 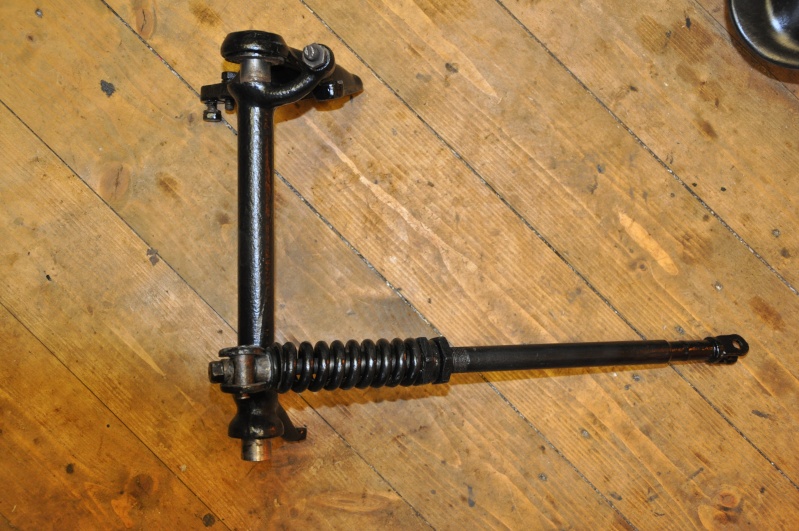 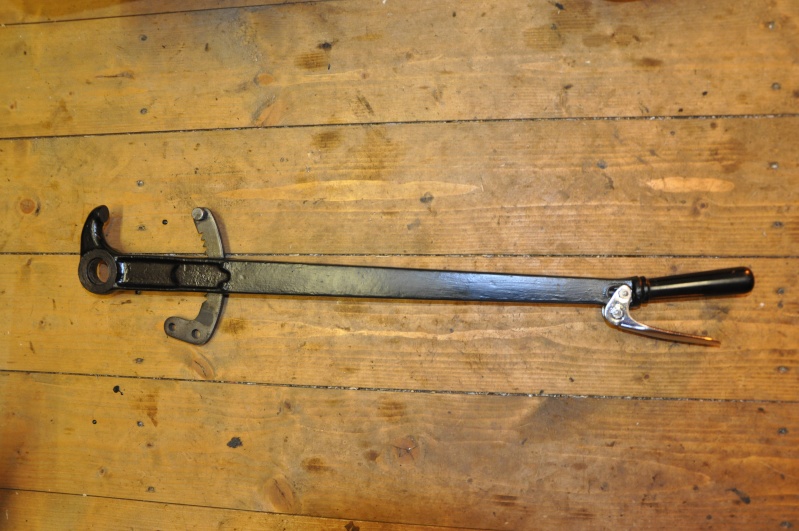 I decided I really must get on and sort out the chassis this spring/summer so the first job was to remove the front axle, steering arm and shock absorbers. This only needed the removal of 8 bolts and I could lift the chassis away from the axle and roll it away. Sounds simple but as soon as you remove the chassis from the front end the steering lost its rigidity and the wheels were flopping all over the place. One of those jobs where you wish you had asked for a second pair of hands. Still, got there in the end. The front end looks in reasonable condition with just more of the surface rust. There will be some refurbishment needed on this part to the shock absorbers, the kingpins, and possibly the track rod ends and other steering joints yet to be checked. Although my rear shocks had a slight problem when they were sent away to Stevson Motors of Birmingham - they got lost for a while! - I think I will still use the company again to refurb the front ones. The rears were Armstrong lever-arm dampers but the front ones are Luvax. This was the correct set-up for this year however, and I would rather overhaul them and preserve originality than replace with others. All of the rubber bushes on the drop-links to the shocks will need replacing and I am hoping Stevsons will do these for me at the same time as they did with the rears.  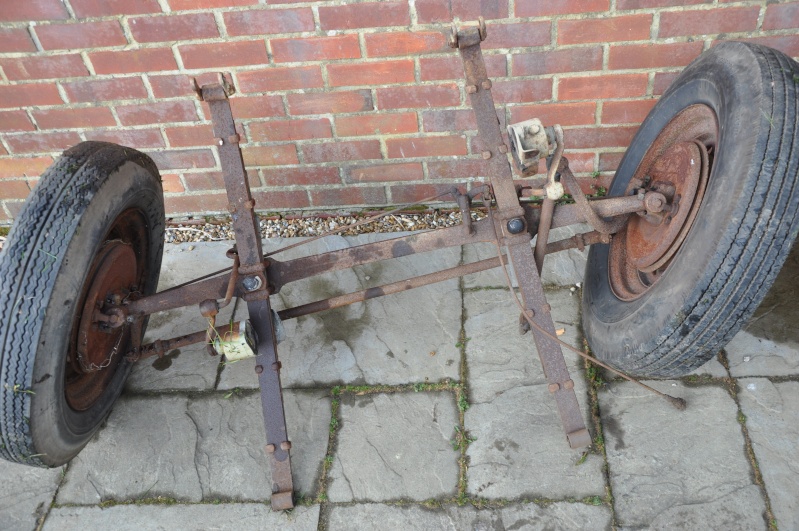 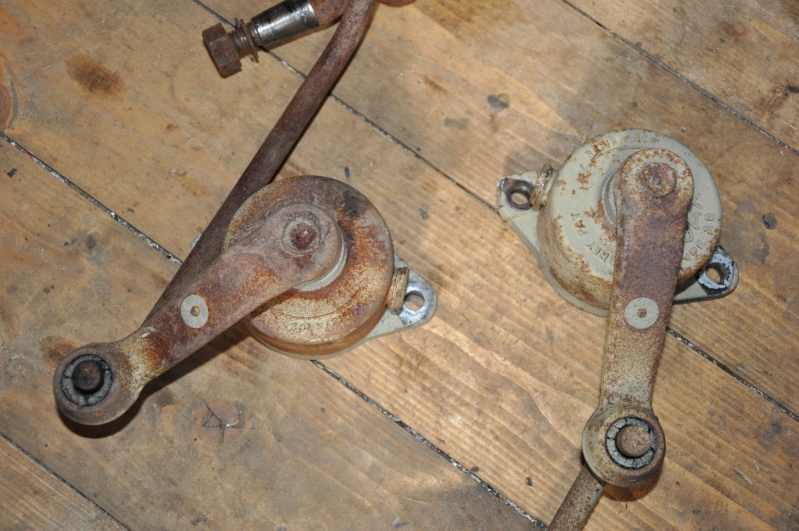  It will be good to start on the front end and get that looking good. I think the chassis needs to go on some trestles on the patio for a thorough rub down and check-over before rust treatment and chassis black. Not to sure how i will get into some of the box sections yet although there are plenty of access holes. Once that's done I will have to get it into the garage and the body will need to come out onto the drive and live under a cover unfortunately. there's nothing I can do about this as I only have a single garage. Luckily the drive is quite long so I can probably fit it in somewhere. Then I can build the chassis up in the dry and refit all of the nice shiny bits before starting on the body itself. I have decided not to do the wheels just yet as the four I have with inflated tyres will be good enough for the rolling chassis. If I take them off to do the rims then the tyres will probably disintegrate and I will have to buy four new ones only for them to sit on the car without turning and they will probably go square. It will be better to save that job for later and then fit new tyres when we are nearer the car moving under its own steam. I just wish I could find more time to get on with it around work commitments, but I am determined to do this.   Hopefully, if the weather is OK, I might get the front axle stripped down this weekend then I can start on the refurb so I will have some good pics to show you on the next update. That's all for now though. Have a good Easter and enjoy the new Classic Car season. Kind regards Steve F. | |
| | | | Austindox
Location : Margate
Cars : 1938 Austin 12/4 New Ascot
Posts : 54
Occupation : -
| | Subject: Re: Austin 12 New Ascot Project Tue Apr 09, 2013 6:19 am | |
| Hi all Just made a start on dismantling the front axle. Needed a bit of heat to get the steering joints apart on one end but the nearside one won't give at the moment. I had to separate this end at the track rod end instead. Both Track Rod Ends seem to be in reasonably good fettle without too much wear and slop. However, it seems almost pointless to reassemble it with the same ones in place as they are likely to wear quickly once the car is back in use. I think discretion will be the better part of valour and I should get some replacements.  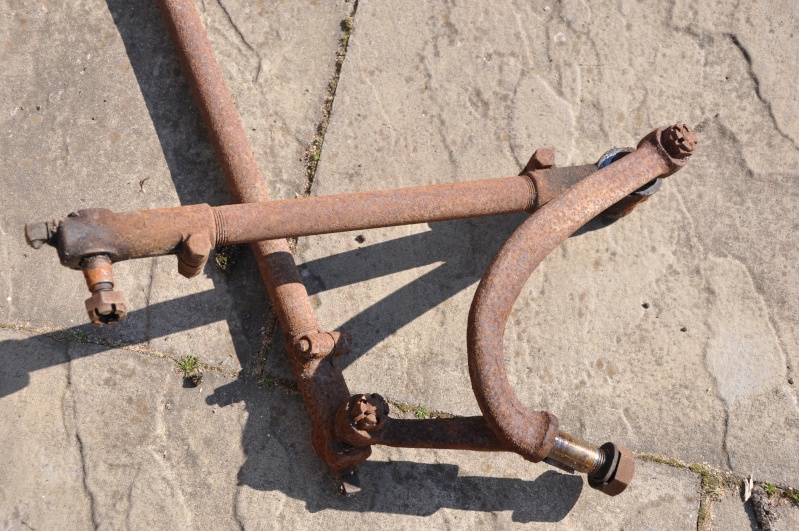 The leaf springs were easily removed and appear generally okay. There is a bit of slippage in a couple of pieces of the zinc inter-leaving which I have manage to manoeuvre back into place. I suppose the best solution to this would be a complete refurbishment of the pair of springs to replace the zinc properly. However, I have to be a bit cost-conscious and this would be an expensive fix for what will probably be very little gain. I thought about removing the fox clips and and rebuilding the springs myself with replacement zinc, as a cheaper option. Unfortunately I am not sure it would be much cheaper in the end as the fox clips are riveted in place and I am not sure where to get replacements that can be fitted at home. If anyone has any ideas on this I'd be pleased to hear them. 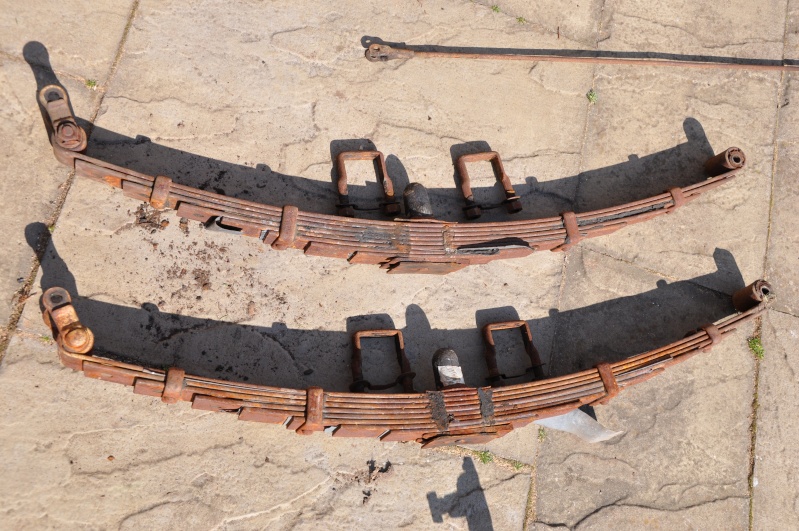 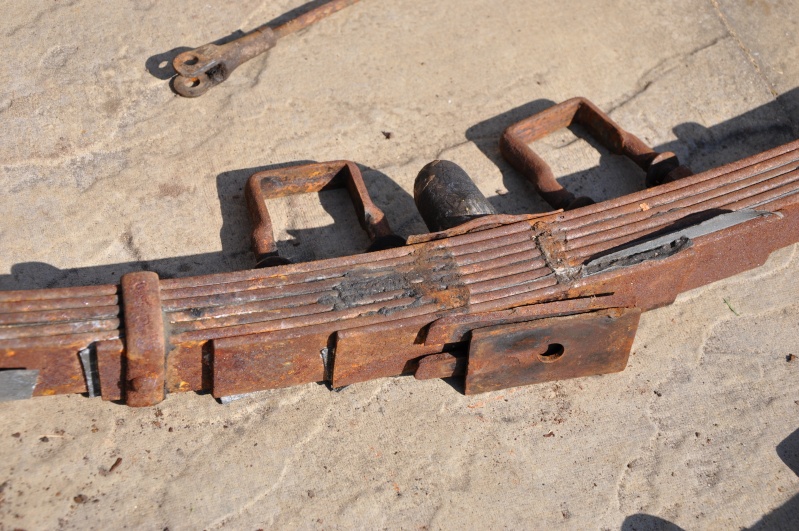 I haven't had time to attempt the kingpin removal yet and will need to read up on this anyway. There is certainly a cotter pin arrangement involved and the club hire out a special tool which I will probably need to borrow. Again there is not a great deal of wear evident but I feel that this will be another one of those jobs that should really be done while the unit is off the car. The front brakes seem really good with only minimal wear. I will probably leave these alone, just going for a strip down, lubrication and reassembly one the backplate is painted. I will also need to get a hub removal tool to get the front hubs off. The one I bought at Beaulieu last year is the wrong size. The club sell these so I know I can get hold of one when I need to. Talking of Beaulieu, I am hoping to go to the Spring Autojumble again this May. This is always a good place to pick up parts but can be expensive. The Autumn one is bigger and better but I won't be able to go to that one this year so the Spring will have to do. Well, I haven't got much more to tell you at the moment and I'm away on my hols for a while so wanted to put an update on before I went. All I can do at the moment is leave you with a pic of a rather nice Austin 12 New Ascot I saw at a show last year which was restored from a basket of bits in a lot worse state than mine. Mind you the guy was a blacksmith so his metal working skills are almost certainly a whole world better than mine. If I can get something close to his achievement I will be very pleased. I won't be putting modern indicators on it though!!  Kind regards Steve F. | |
| | | | Austindox
Location : Margate
Cars : 1938 Austin 12/4 New Ascot
Posts : 54
Occupation : -
| | Subject: Re: Austin 12 New Ascot Project Tue Jul 15, 2014 6:47 am | |
| Hi all Sorry there have been no updates on here for so long. Truth be told, I have had to have some time away from the car through work pressures, setting up a new business and a bit of illness too. I'm back on it now though and hopefully picking up more momentum now. So where have we got to. Well, the chassis stripdown was completed and it is now resplendent in gloss black chassis paint.  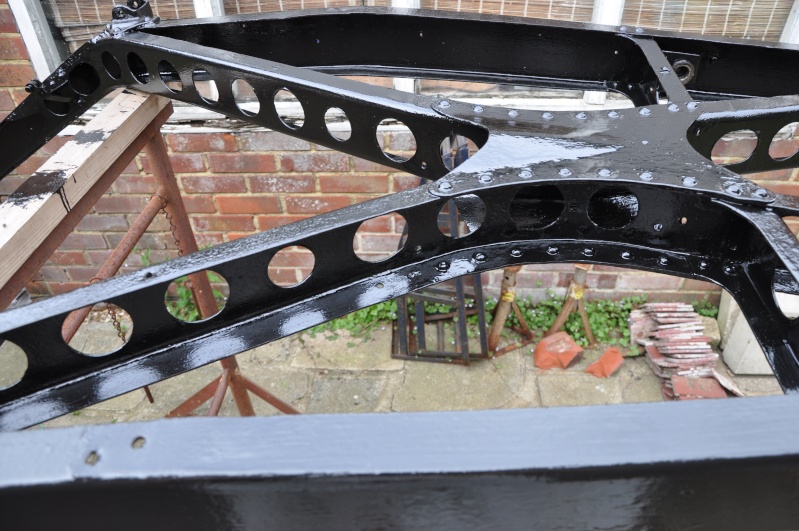 I have prepared various mounting plates and clips from the chassis ready to go back on and the next stage will be to start building up the chassis from the hundreds of pieces that I have got scattered around the shed and garage. It has been quite hard to get some replacement fixings as I am too fussy by half sometimes. The secondary wiring loom to the rear lights and fuel sender was carried in open P-clips held in place with 3/16 BSF cheese-head setscrews. Trying to find replacements screws is a nightmare but I've managed to find just enough on E-bay. Even TV Bond in Ramsgate High Street couldn't help. You know you're in trouble when he can't sort you out. If you haven't tried him out yet he is a mine of information for the old threads etc. I'm just waiting for the wheels to come back from Windridge Coatings. I had decided I wouldn't have any powder coating at all as it didn't fit with the vehcile's age. I was persuaded into this when I took the wheels there to be shotblasted. He is only charging me £35 a wheel for the full treatment and, as he said, it will give a more robust finish than paint and it will be hard to tell the difference. Saves me work too! Hopefully I'll have some picks to add next week. I've also finished off the D-light that I was painting a while ago. I'm quite pleased with the finish but I'm especially pleased to have found some of the 'unobtainable' rubber shields while I was at Beaulieu last autumn.  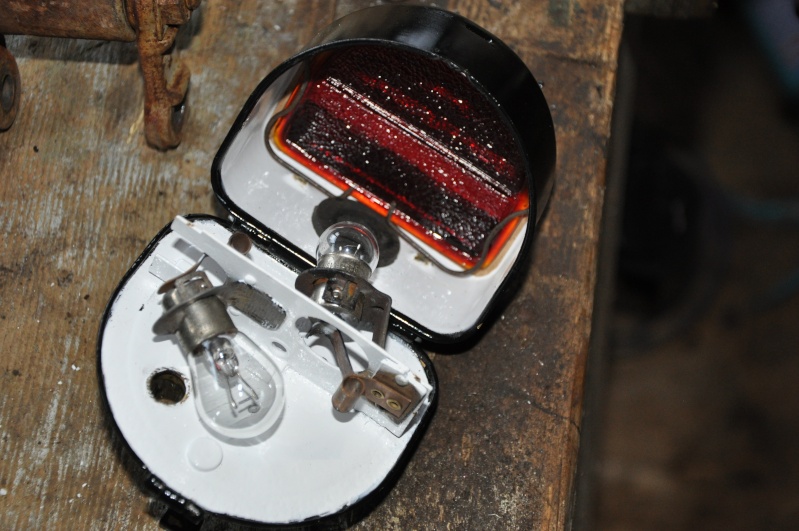 Today I have been working on the engine mountings which are a bit sad. The rubber has gone a bit saggy and has separated from the mounting plate on one of them. Also, one of the fixing bolts has sheared off. I found a really helpful place on the Haine Industrial Estate at Ramsgate called Samson Challis. They are into all things rubber (!) and he managed to supply me with some suitable offcuts of non-abrading rubber for £10. I now need to find a suitable bonding agent to keep the rubber and the metal together. I have drilled out the sheared bolt and am in the process of fitting a coach bolt in to replace it. Anyone got any ideas on a suitable bonding agent? I'm thinking two-part epoxy glue but I'm going to do some research to find the most suitable one.  The front leaf springs are in the process of being refurbished as I have said before they need to go away as the zinc interleaving is coming out and I am hoping they can be checked over and refurb'ed by a company called Rossendale Road Springs. Hopefully they can help and will turn them around quite quickly. I'm glad I've got the bug back again for this project. I don't think I ever lost it but other things got in the way and it became too easy not to find the time. I will try to get more regular updates on here now as the project turns a corner and I start to fit up the chassis once more. I will be pumping it full of Waxoyl before I do this so that will be the next job then it will be some of the rear axle and suspension to go on next. see you soon Steve F. | |
| | | | Split-Lee
Admin
Location : Margate
Cars : 1962 Splitscreen VW Camper, 1983 VW Polo
Posts : 4543
Occupation : Doing as little as possible.
| | Subject: Re: Austin 12 New Ascot Project Tue Jul 15, 2014 7:43 am | |
| Looking great! Good to hear you are back working on the car!
~Lee | |
| | | | Austindox
Location : Margate
Cars : 1938 Austin 12/4 New Ascot
Posts : 54
Occupation : -
| | Subject: Re: Austin 12 New Ascot Project Mon Aug 18, 2014 3:32 am | |
| Hi all Time for another update. Last time I left you with the news that I was going to send my front leaf springs away for a refurb as the zinc interleaving was coming out. While I was getting some quotes it became apparent that the interleaving was going to be discarded by all of the companies as it was not something that was required anymore. All of the companies would be retempering the springs and painting them up for me and the cost was variable between about £150 and £200 including VAT. I didn't see much need for the springs to be retempered and sone of the companies even said they appeared to be in good condition from the photos. That meant I was paying out up to £200 to have the zinc interleaving removed. Didn't make a lot of sense to me so out with the Dremel and a handful of rather fragile cutting discs and the protruding bits of zinc were cut off. The springs were then wire brushed and cleaned before rust treatment and painting in two-pack chassis black. They look fine and I have no reason to think they won't be good enough for the job.  I have also finally painted up the steering mechanism and fitted the new track rod ends which look good. The mechanism also moves feely. I agonised over this as well, as the track rod end I have fitted are after market stock not OEM. The originals that were still on the car are repairable with new shims and rubbers etc but I am going for practicality here rather that complete originality. I have kept all of the originals so that if the mood ever takes me, I can rebuild them later. 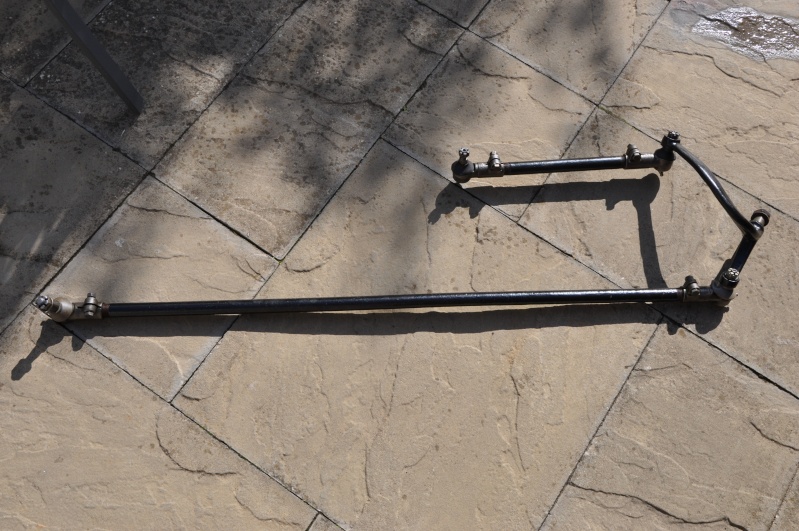  As I had decided not to spend money on the front springs, I sent off my front shock absorbers for refurb instead. I had used a company called Stevson Motors in Birmingham for the rears which were Armstrong Lever Arms. The front shocks were Luvax of a rotary design. This is the correct set up for this car as it was a transition model between the older 12/4's and the new alligator bonnet Austin 12's from 1939 onwards. Stevson's had made a good job of the rears, although they lost them for a while, but no such problem with the Luvax shocks. These were, again, pronounced to be in pretty good shape, which is fortunate as they can be a bit expensive to repair. Mine were duly cleaned, serviced and painted and sent back in double quick time for a reasonable £165 (+ the dreaded VAT). I'm pleased with how they look and they feel smooth in operation.  I have also got the wheels back from Windridge Coatings after their powder coating. They were put through the incinerator to burn off any old crud that was still on them, then blast cleaned before powder coating in gloss black. They look awesome 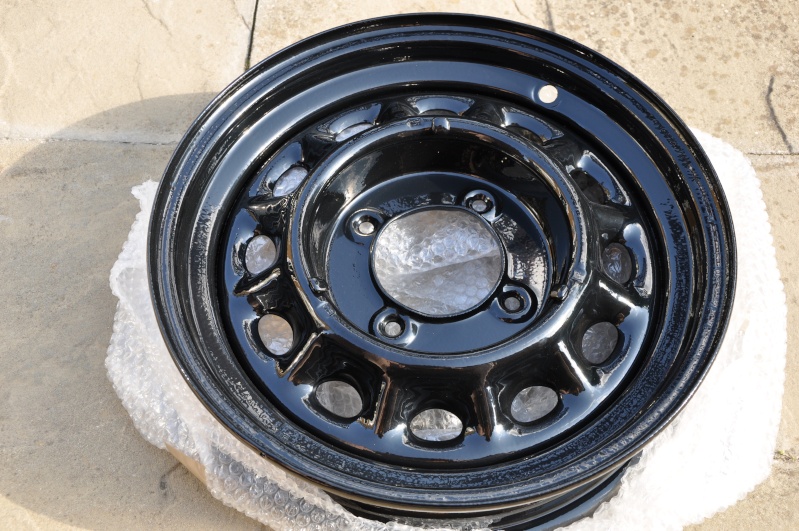 I have found a slight problem while starting to rebuild the chassis. I left the Metalastic bushes in the chassis as I didn't want the bores rusting. The bushes in the springs came out well using an oversize and undersize socket with a coachbolt through the centre. Winding the nut onto the coach bolt drew the bushes out nicely. Not so on the bushes in the frame. After much eye-popping, swearing and sevral coahbolts shearing off the bushes hadn't moved at all. I don't really want to use heat as I've already painted the chassis but its looking as though thats the way forward and I'll have to repaint those bits afterwards. I have removed the centre tube and rubber section from the bushes and just need to get the outer tube out of the bore. I'm trying cutting through the outer tube without cutting into the bore to try to release the grip it has on the frame. Its taking ages and defying my best efforts at the moment. I'll get there somehow. Any ideas anyone? Ok. That's all for now. I'll get those bushes out over the next few days with a bit of luck so I can fit the new bushes and start rebuilding the chassis. I want it in the garage for winter. Off to Beaulieu International Autojumble in a couple of weekends time (6th and 7th Sept). Fantastic event. Biggest autojumble in Europe I think. Hopefully get a new wiring loom ordered from there and find a few smaller bits. Update to follow soon. Kind regards Steve F. | |
| | | | bennygoodman

Posts : 26
| | Subject: Re: Austin 12 New Ascot Project Fri Sep 19, 2014 1:53 am | |
| Hello Steve, I know it's my first post but I need a little help, I am helping friend rebuild his Austin 12, it was all but complete and was sent to the upholsterer for the roof lining to be fitted but the upholsterer has lost the sunroof, how this happened I do not know but now we are stuck with a large hole in the roof.
Any chance you could you could take some pictures of the sunroof of your car especially the brackets on the sliding roof and the place it fits into the roof please so we have something to work on. | |
| | | | Austindox
Location : Margate
Cars : 1938 Austin 12/4 New Ascot
Posts : 54
Occupation : -
| | Subject: Re: Austin 12 New Ascot Project Sat Sep 20, 2014 6:21 am | |
| Hi Benny
sorry i didn't get back to you sooner. My sunroof was already out when I got the car but i should be able to find some time over the weekend to get some photos for you. If you PM me your e-mail address I can send them to you. Have you got any pics of your project?
Regards
Steve F. | |
| | | | bennygoodman
Posts : 26
| | Subject: Re: Austin 12 New Ascot Project Sat Sep 20, 2014 8:48 pm | |
| I just tried to reply with pictures but the admin rules state I can't post external links (photobucket) until I have been a member for 7 days, I'll post them when the 7 days are up and I'll pm you my email. | |
| | | | bennygoodman
Posts : 26
| | Subject: Re: Austin 12 New Ascot Project Sat Sep 20, 2014 8:55 pm | |
| Steve, I just tried to pm you my email address but it won't let me do that for 7 days neither but as you have just posted yours up I'll send you some pictures of our project, and if you could get me some pictures of your sunroof I would appreciate it.
I just emailed you on the hotmail address further back in the post, hope thats the correct one. | |
| | | | Sponsored content
| | Subject: Re: Austin 12 New Ascot Project | |
| |
| | | | | | Austin 12 New Ascot Project | |
|
Similar topics |  |
|
| | Permissions in this forum: | You cannot reply to topics in this forum
| |
| |
| |