| | My DLM rebuild (photo heavy) |  |
|
|
|
| Author | Message |
|---|
Hatch DLM

Location : Tiptree
Cars : DLM 1 & my daily DLM 1
Posts : 1264
Occupation : Retired HGV 1 driver, Now full time layabout
 |  Subject: My DLM rebuild (photo heavy) Subject: My DLM rebuild (photo heavy)  Wed Oct 27, 2010 1:04 am Wed Oct 27, 2010 1:04 am | |
| Hi Thought I'd introduce the DLM This was first registered in April 1959, and I'm the second 'registered' owner I say Registered as I bought it of a friend in the early 1970's (71-72 can't recall) It had been in his garage for, if memory is correct, about 7 years. It was covered in bits of fibreglass resin, the bonnet had been used to mix said resin on. Anyway we moved it out of the garage, checked the engine and gearbox rotated by hand, checked the brakes worked. drammed and refilled all oils, a gallon of petrol, a battery and we started to see if it would run. It spat and banged but wouldn't run, so we tried a tow start, it ran but smoked like a train wouldn't stay in any gears and the back axle sounded like it wanted to leave the car. Too late I had already fallen in love with it. And for £20 it was mine. At the time I was told it was an Austin chassis, a common thought from other classic enthusiasts due to the front wheels. This was what it was in the 70's (as I was told) Engine : 1953 Ford E93a with full Aquaplane conversion, camshaft, head, manifolds and twin MC2 SU's Gearbox : Ford E93a Rear axle : 1930's Morris ?? Chassis : was told Austin 12 shortened Front axle, hubs and drums : Standard 9 but with Ford 105e back plates and brakes Wheels : made for the car from West London Wheels. After a lot of fun and games trying to source parts for last years rebuild (the second in my ownership) I now know the Chassis to be from a 1935 Standard 9 but with a few changes. Standard 9 steering box removed and rack and pinion steering fitted, the steering arms on the hubs are hybrid as well. A frame work has been welded at the front of the chassis to take the bulkhead, top shock absorber mounts and radiator top mounts, and the cycle wing tops are bolted on to it via a bracket each side. There is a bolt on frame to the rear, to this is fitted an A frame from the top of the rear axle, the bracket to take the tops of the rear shocks, and with another small frame the fuel tank sits on top. When I got the car home and stripped it was found that the engine had no piston rings ?? The gearbox was past it and the Morris axle was found to have a two inch bolt in the housing, never did find where it belonged, but the damage had been done. So the easiest and quickest route was another axle modified to fit. One Ford 100e rear axle modified with spring hangers and top mount for the front of the 'A' Frame was fitted (hence the wire front and steel rear wheels) Rear wheels were also modified by West London Wheels, they had a lot of work from us with the VWSOC. Took the engine for reconditioning, seemed the right thing to do after finding the state of it. While at the garage Says I "Do you know were I can get the gearbox reconed" Says he "What gearbox" "For this engine" says I "Hang on a moment" says he and disappeared out the back. Came back with a crate on a sack barrow. The crate was still unopened with a brand new gearbox, the recon and gearbox cost me £40 OH! how times have changed  So after a few months, new gearbox recon engine, modified rear axle and a couple of planks we were running up and down the mews. One broken rear spring later we stopped p'ing about and got down to the proper job.  I think it was about 9-10 months then it was off to MOT, and on the road. As soon as I recheck how to, I'll post a picture as was in 1973.
Last edited by Hatch DLM on Fri Nov 05, 2010 8:23 pm; edited 1 time in total | |
|
 | |
Hatch DLM
Location : Tiptree
Cars : DLM 1 & my daily DLM 1
Posts : 1264
Occupation : Retired HGV 1 driver, Now full time layabout
| | Subject: Re: My DLM rebuild (photo heavy) Wed Oct 27, 2010 1:27 am | |
| Have tried to post an image as per the guide.
All I get when I click on the "Host an Image" tab is a blank box and a security pop up asking if I will allow an image hosting site access.
Do we need to use an image hosting site or have the image on our PC's
Image hosting site is no problem for me as I use one regularly
Thanks
Roger | |
|
| | |
Hatch DLM
Location : Tiptree
Cars : DLM 1 & my daily DLM 1
Posts : 1264
Occupation : Retired HGV 1 driver, Now full time layabout
| | Subject: Re: My DLM rebuild (photo heavy) Wed Oct 27, 2010 6:14 am | |
| This was 1973, taken in NW London Then started having running problems, time and money, money and time we've all been there. Then we moved and it got put further back ending up in boxes in about 75/6. 
Last edited by Hatch DLM on Fri Nov 05, 2010 8:13 pm; edited 1 time in total | |
|
| | |
Hatch DLM
Location : Tiptree
Cars : DLM 1 & my daily DLM 1
Posts : 1264
Occupation : Retired HGV 1 driver, Now full time layabout
| | Subject: Re: My DLM rebuild (photo heavy) Fri Nov 05, 2010 7:09 pm | |
| Hard to believe this was April last year. That large wooden box/shed is were most of the car sat for 25-30 years. The engine and gear box are wrapped up under the front of the body and on a couple of pallets.  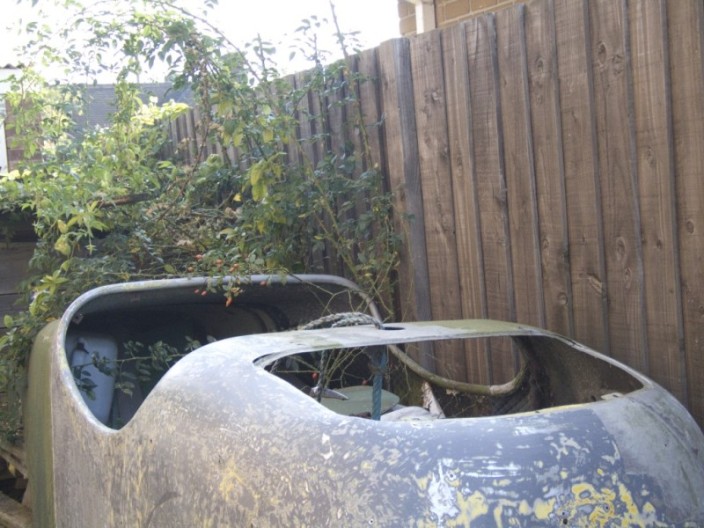  First job was to build a garage extention
Last edited by Hatch DLM on Fri Nov 05, 2010 8:16 pm; edited 1 time in total | |
|
| | |
Hatch DLM
Location : Tiptree
Cars : DLM 1 & my daily DLM 1
Posts : 1264
Occupation : Retired HGV 1 driver, Now full time layabout
| | Subject: Re: My DLM rebuild (photo heavy) Fri Nov 05, 2010 7:12 pm | |
| I see the photos are still a tad wide, have shrunk them to 800, I'll try 700. Save having to keep scrolling. Roger Yep 700 seems right Now to do the other 2000. Don't wory I won't flood the server  | |
|
| | |
Hatch DLM
Location : Tiptree
Cars : DLM 1 & my daily DLM 1
Posts : 1264
Occupation : Retired HGV 1 driver, Now full time layabout
| | Subject: Re: My DLM rebuild (photo heavy) Fri Nov 05, 2010 8:20 pm | |
| This was from half way down my driveway April 2009 The box/kennel on the left is for a mobility scooter 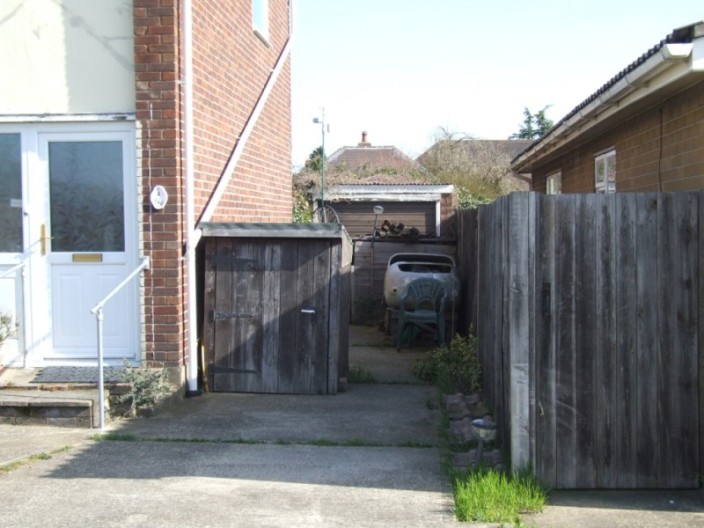 | |
|
| | |
Hatch DLM
Location : Tiptree
Cars : DLM 1 & my daily DLM 1
Posts : 1264
Occupation : Retired HGV 1 driver, Now full time layabout
| | Subject: Re: My DLM rebuild (photo heavy) Fri Nov 05, 2010 8:34 pm | |
| The move starts. 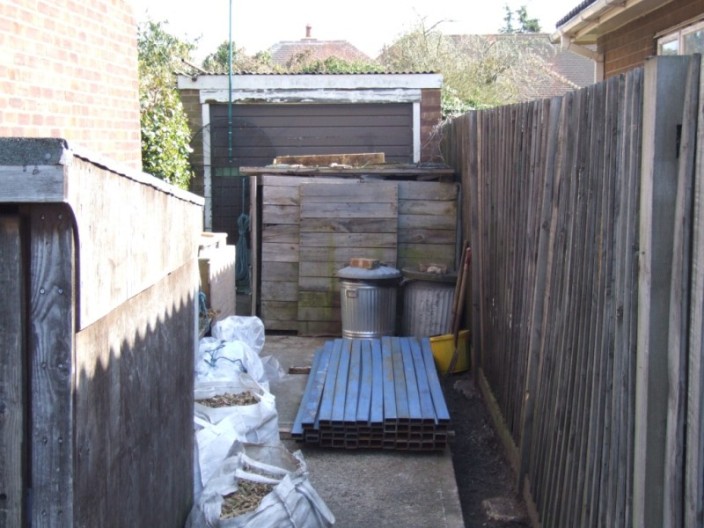 First site of daylight in 30 years Lorry tarps. and 8x10 sheets of polystyrene did a good job of protection   Chassis on a sack barrow The farthest it had moved in years.  | |
|
| | |
Hatch DLM
Location : Tiptree
Cars : DLM 1 & my daily DLM 1
Posts : 1264
Occupation : Retired HGV 1 driver, Now full time layabout
| | Subject: Re: My DLM rebuild (photo heavy) Fri Nov 05, 2010 8:43 pm | |
| The silencer I think had had it  Now got one from a Massey Furguson.  That was about the only part that neede changing. Airial shot of a Nude car 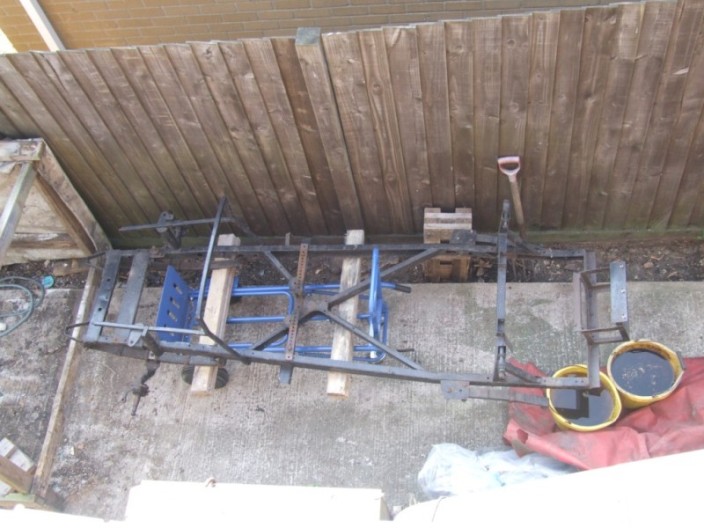 And this is were it stood while the garage was made ready. Good job the neighbours are friendly.  | |
|
| | |
Hatch DLM
Location : Tiptree
Cars : DLM 1 & my daily DLM 1
Posts : 1264
Occupation : Retired HGV 1 driver, Now full time layabout
| | Subject: Re: My DLM rebuild (photo heavy) Fri Nov 05, 2010 9:11 pm | |
| A start was made on the extention but had to posponed for a couple of months so it was in July that we had to start the extention and in over a week the main cover was done. The rest took a little longer. From this  To this in 8 days, includes day out shopping etc. 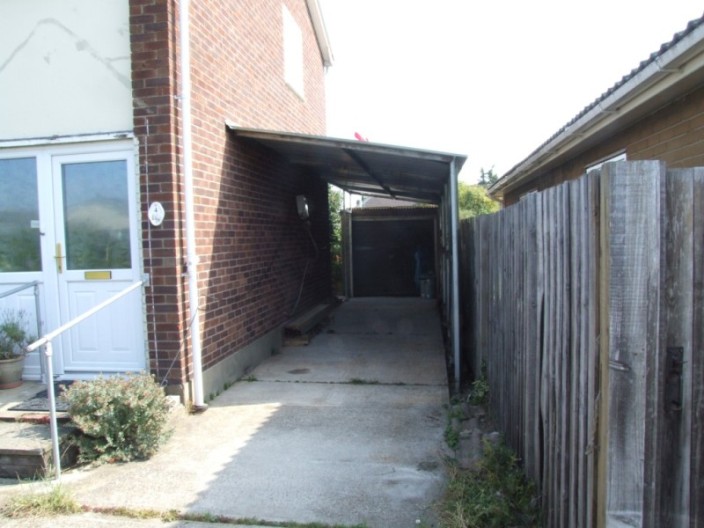 Then one man operation 5 weeks to this.   Doors have been sealed around now. | |
|
| | |
Austin powers
Admin

Location : Margate in the Garden of England
Cars : 1963 Austin A60 Cambridge & 1960 Rover P4 80
Posts : 1327
Occupation : Paddle seller -- up the creek.
| | Subject: Re: My DLM rebuild (photo heavy) Fri Nov 05, 2010 9:58 pm | |
| Great pictures & good idea, look to be a really handy space now.  | |
|
| | |
Hatch DLM
Location : Tiptree
Cars : DLM 1 & my daily DLM 1
Posts : 1264
Occupation : Retired HGV 1 driver, Now full time layabout
| | Subject: Re: My DLM rebuild (photo heavy) Fri Nov 05, 2010 10:33 pm | |
| Will be even more when I can afford to re roof the old garage, going to continue the steel, with the same slope, down to the end of the old garage. Got a enough old secondary double glazing windows to glaze the one side, above the bricks. Also a workshop at the bottom of the garden, can move a lot of the "I'll need this one day" junk out of the way. The amount of light in the new part was an added bonus, considering its only one window at the side and the part glazed front. AND being steel, south facing with the sun all day keeps it warmer. | |
|
| | |
Hatch DLM
Location : Tiptree
Cars : DLM 1 & my daily DLM 1
Posts : 1264
Occupation : Retired HGV 1 driver, Now full time layabout
| | Subject: Re: My DLM rebuild (photo heavy) Sat Nov 06, 2010 9:21 am | |
| Indoors at last My mate is standing were the body was a few shots before. 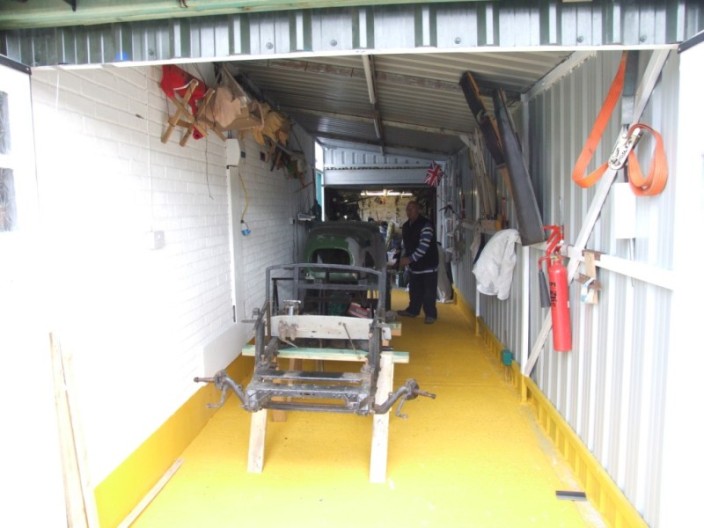 As can be seen surface rust,  I started to scrape and wire brush but it was going to take forever, If I could get to every little crack.  Decided the cost of sand blast and powder coat worth it, and beeing a lazy B was easier.  Back from the oven  | |
|
| | |
Split-Lee
Admin

Location : Margate
Cars : 1962 Splitscreen VW Camper, 1983 VW Polo
Posts : 4543
Occupation : Doing as little as possible.
| | Subject: Re: My DLM rebuild (photo heavy) Sat Nov 06, 2010 10:20 am | |
| Brilliant, can't wait to see the next lot of pictures! ~Lee | |
|
| | |
Hatch DLM
Location : Tiptree
Cars : DLM 1 & my daily DLM 1
Posts : 1264
Occupation : Retired HGV 1 driver, Now full time layabout
| | Subject: Re: My DLM rebuild (photo heavy) Sun Nov 07, 2010 1:33 am | |
| OK I'll skip a few and start from the suspension and axles on A Ford 100e rear axle Before 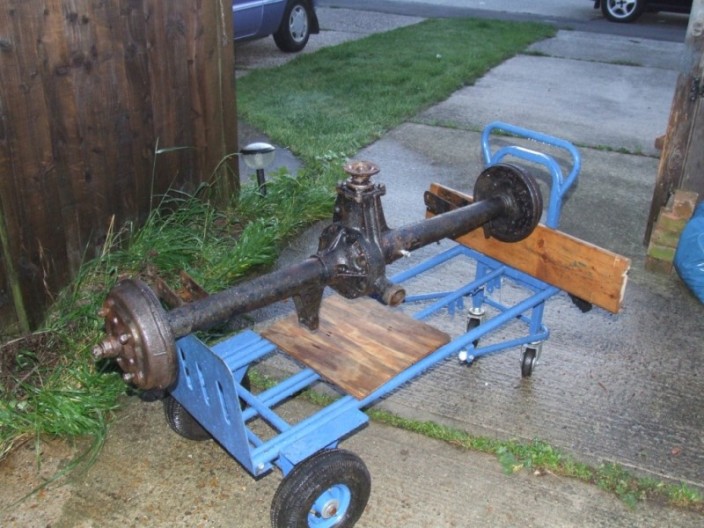 After and now on the springs. 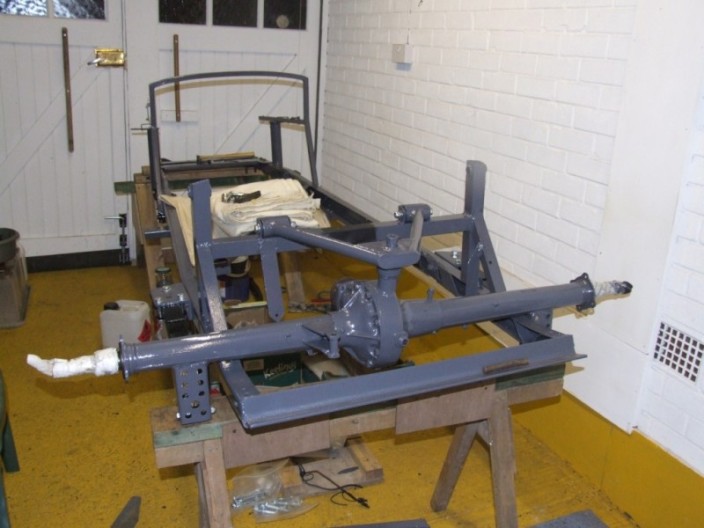  Both axles on, brake pipes done, wheels on The frame at the rear, over the axle, takes the fuel tank, it sits on top.  Daylight at last  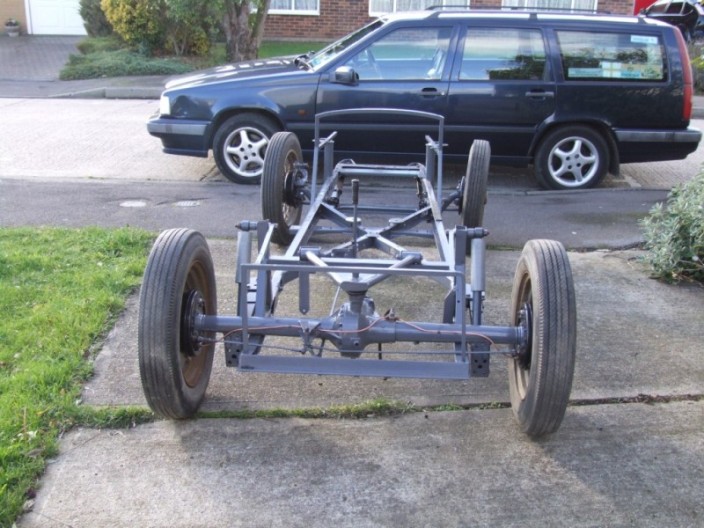 PS. A close up of the A frame, stops the axle from torqueing I forget the proper name for it 
Last edited by Hatch DLM on Sun Nov 07, 2010 7:45 pm; edited 1 time in total | |
|
| | |
Hatch DLM
Location : Tiptree
Cars : DLM 1 & my daily DLM 1
Posts : 1264
Occupation : Retired HGV 1 driver, Now full time layabout
| | Subject: Re: My DLM rebuild (photo heavy) Sun Nov 07, 2010 6:57 am | |
| Now with some trepidation the engine and gearbox. If the engine had to be rebuilt any Major overhaul machine wise would have been out of the question, it was maxed out on the last re-con and would have meant another unit. Gearbox remember is relatively new. Looks grubby. 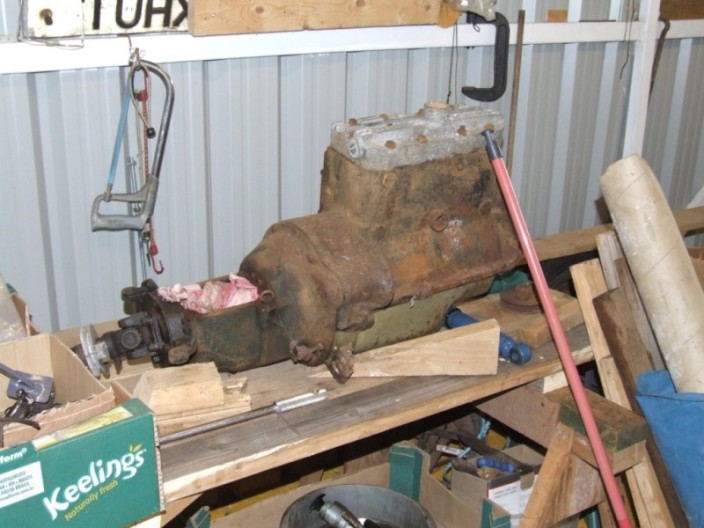 So, Off with is ead. And the gearbox, clutch being removed.  First look in the bores looked bad, but a cellulose soaked rag and elbow grease removed what turned out to be old oil tarnish, or that what it seemed to be. Any way the bores looked as clean as could be expected. Everything moved as it should, all went up and down were it should. Oil was drained off, looked clean. Things were definitely looking up. 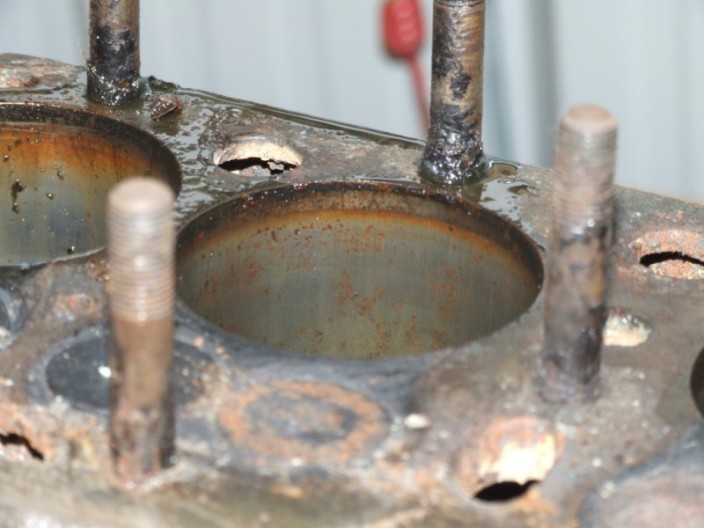 Engine and Gearbox now cleaned and painted. Neither were stripped down, apart from what can be seen, as everything seemed ok it was "Try it and See". 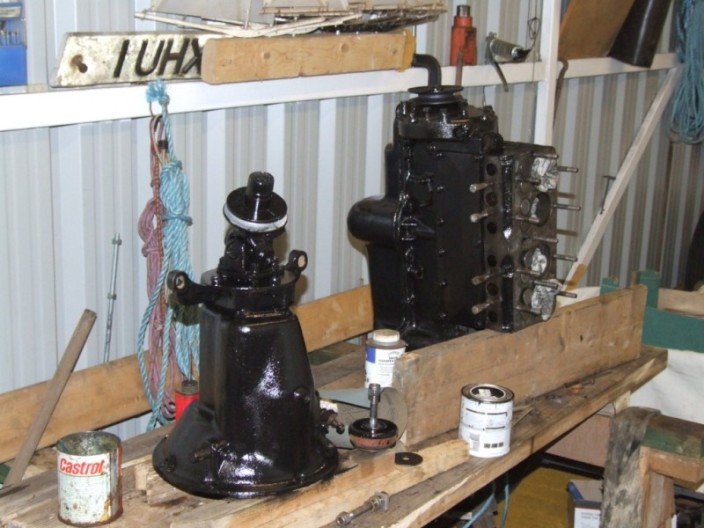 Back as one 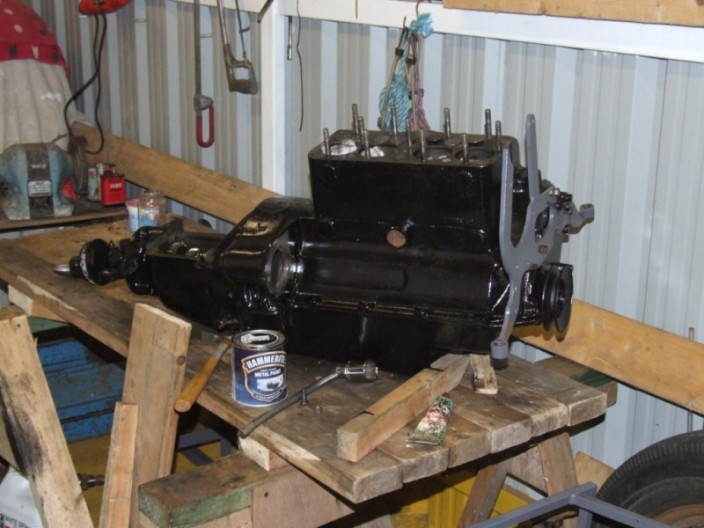 THERE WILL NOW BE A SHORT INTERMISSION WHILE I GET A BEER | |
|
| | |
Austin powers
Admin
Location : Margate in the Garden of England
Cars : 1963 Austin A60 Cambridge & 1960 Rover P4 80
Posts : 1327
Occupation : Paddle seller -- up the creek.
| | Subject: Re: My DLM rebuild (photo heavy) Mon Nov 08, 2010 5:58 am | |
| | |
|
| | |
Hatch DLM
Location : Tiptree
Cars : DLM 1 & my daily DLM 1
Posts : 1264
Occupation : Retired HGV 1 driver, Now full time layabout
| | Subject: Re: My DLM rebuild (photo heavy) Mon Nov 08, 2010 8:16 am | |
| Thanks Tony As to the camera, an old Fuji Finpix 9500. Still can't believe how quick it all went This was Novermber and exactly two months since it was first under cover. Mind you being so basic and simple, "A four wheel motor bike " was a friends reaction. Engine in, no hoist needed, no access problems.  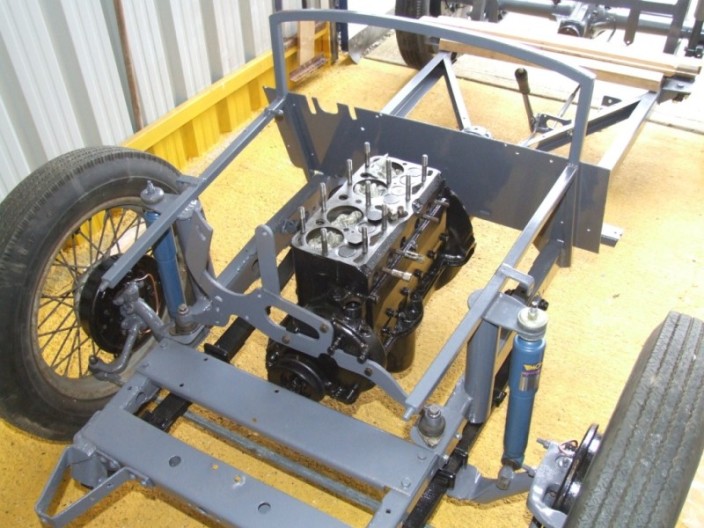 | |
|
| | |
Hatch DLM
Location : Tiptree
Cars : DLM 1 & my daily DLM 1
Posts : 1264
Occupation : Retired HGV 1 driver, Now full time layabout
| | Subject: Re: My DLM rebuild (photo heavy) Mon Nov 08, 2010 8:29 am | |
| Head on water pump on steering rack on  Propshaft and speedo drive  The seat looks dodgy hahaha  Bulkhead/firewall on, just a couple of alluminium sheets. 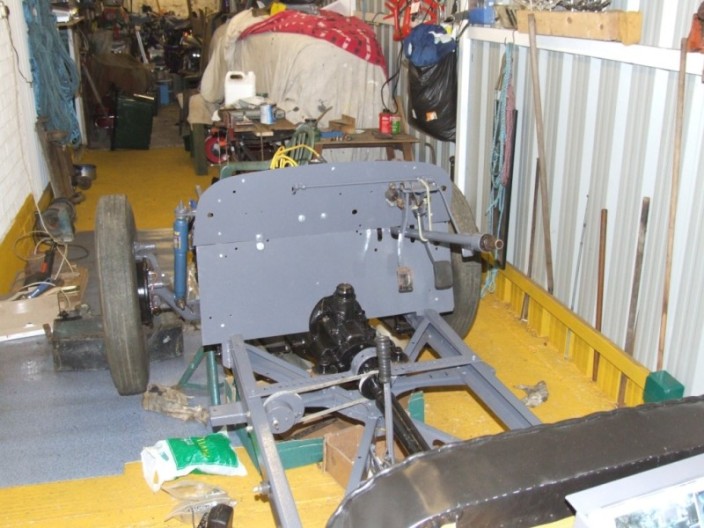 | |
|
| | |
Hatch DLM
Location : Tiptree
Cars : DLM 1 & my daily DLM 1
Posts : 1264
Occupation : Retired HGV 1 driver, Now full time layabout
| | Subject: Re: My DLM rebuild (photo heavy) Mon Nov 08, 2010 8:41 am | |
| Bits and Pieces 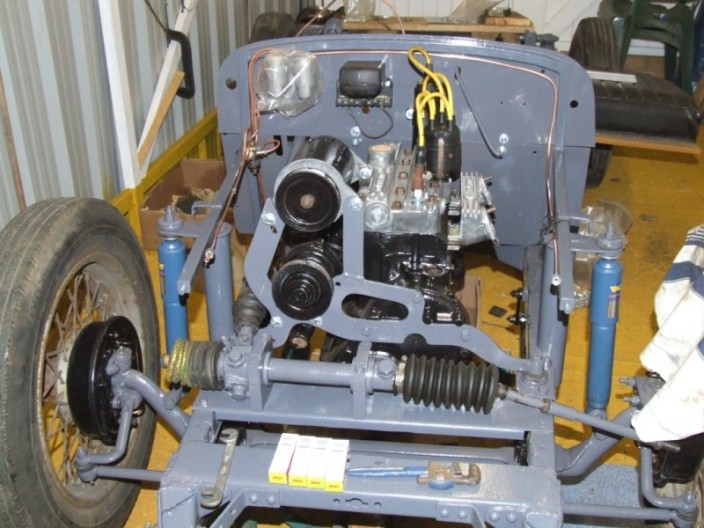 Looks better without the body HHAHA  | |
|
| | |
Hatch DLM
Location : Tiptree
Cars : DLM 1 & my daily DLM 1
Posts : 1264
Occupation : Retired HGV 1 driver, Now full time layabout
| | Subject: Re: My DLM rebuild (photo heavy) Tue Nov 09, 2010 10:30 pm | |
| Only a couple of months I started to worry that everything was going back together too easy and I'd missed something. But then again I prefer it that way, Easy that is.  The one job I hate wiring, but it was not as bad as I expected, mind you with help from a professional made it easier.  Anyone for spaghetti 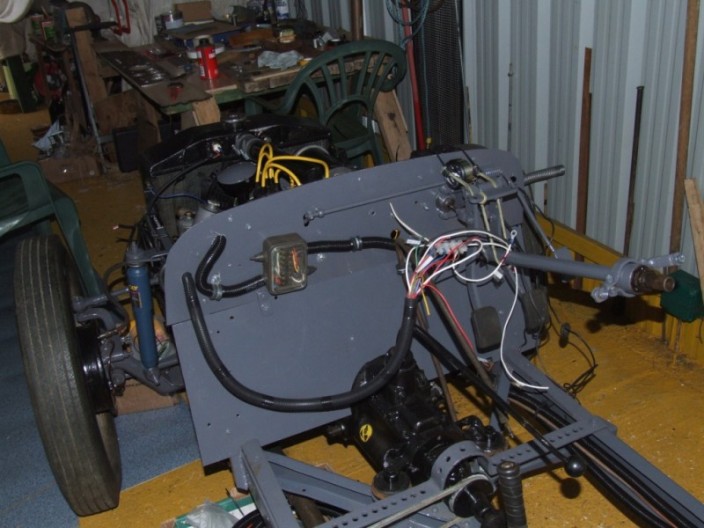 | |
|
| | |
Hatch DLM
Location : Tiptree
Cars : DLM 1 & my daily DLM 1
Posts : 1264
Occupation : Retired HGV 1 driver, Now full time layabout
| | Subject: Re: My DLM rebuild (photo heavy) Tue Nov 09, 2010 10:40 pm | |
| The old 'Tatty' dash panel 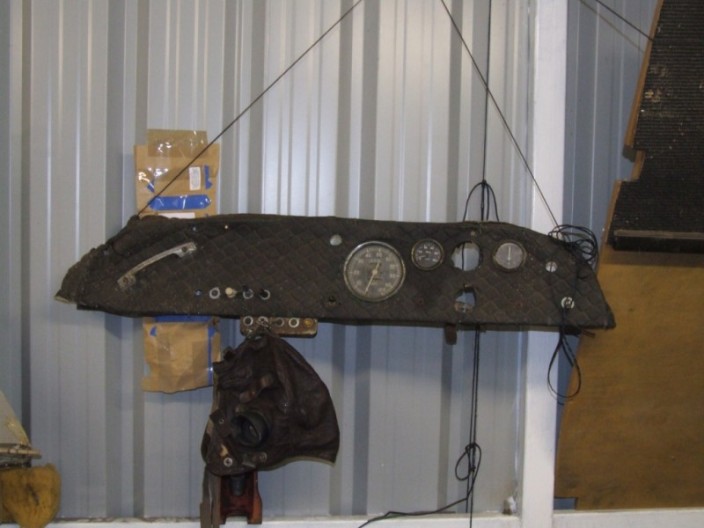 The new alluminium panel marked out and part drilled and a lot of fileing, kept me warm  Temperarily hung in place to check cable lengths and runs.  | |
|
| | |
Hatch DLM
Location : Tiptree
Cars : DLM 1 & my daily DLM 1
Posts : 1264
Occupation : Retired HGV 1 driver, Now full time layabout
| | Subject: Re: My DLM rebuild (photo heavy) Tue Nov 09, 2010 11:11 pm | |
| Veneered, cut out, ready for varnish. 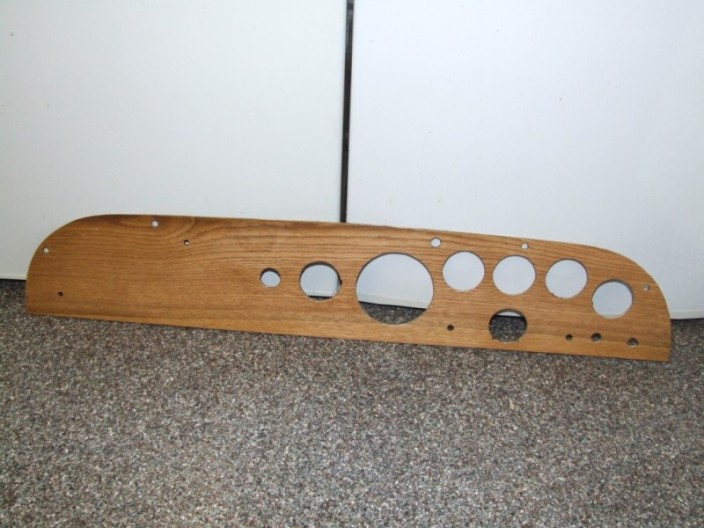 After about 6 coats yacht varnish.  Now in place ready for the wiring 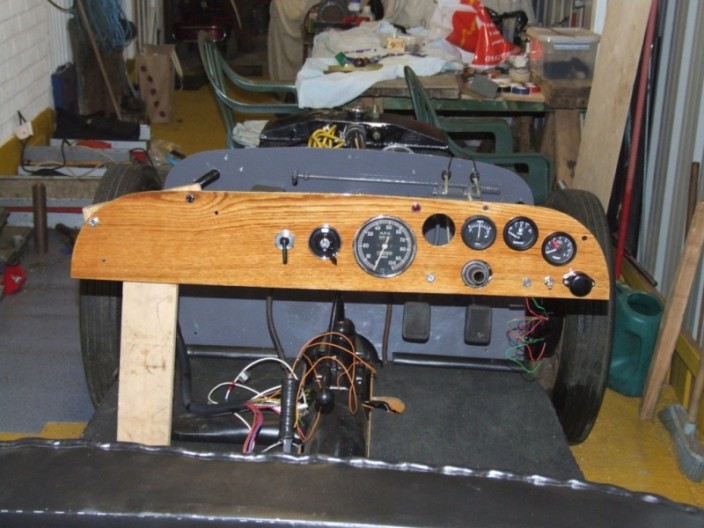 | |
|
| | |
Hatch DLM
Location : Tiptree
Cars : DLM 1 & my daily DLM 1
Posts : 1264
Occupation : Retired HGV 1 driver, Now full time layabout
| | Subject: Re: My DLM rebuild (photo heavy) Tue Nov 09, 2010 11:58 pm | |
| Engine run up Checking out systems etc. before starting on the bodywork It was found to have a water leak, water pump needed all new innards Click on the image for a small video 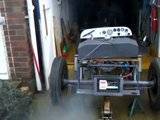 | |
|
| | |
Hatch DLM
Location : Tiptree
Cars : DLM 1 & my daily DLM 1
Posts : 1264
Occupation : Retired HGV 1 driver, Now full time layabout
| | Subject: Re: My DLM rebuild (photo heavy) Wed Nov 10, 2010 12:05 am | |
| | |
|
| | |
Hatch DLM
Location : Tiptree
Cars : DLM 1 & my daily DLM 1
Posts : 1264
Occupation : Retired HGV 1 driver, Now full time layabout
| | Subject: Re: My DLM rebuild (photo heavy) Wed Nov 10, 2010 2:30 am | |
| Just checking everything fits, no snagging, cable runs etc. 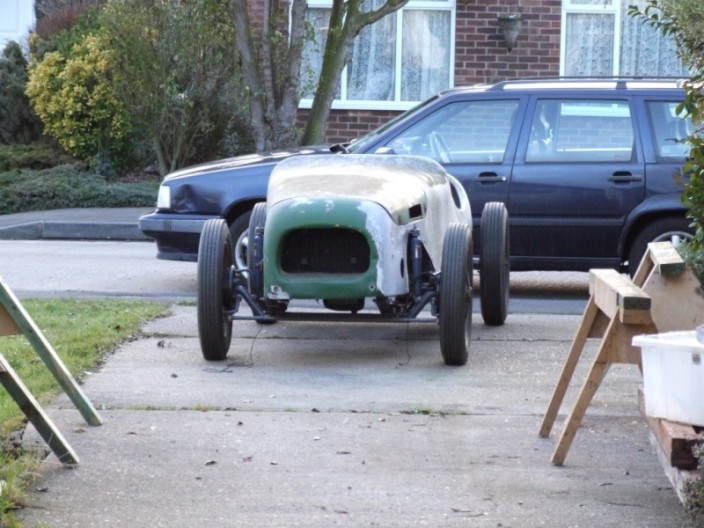  Rolling chassis, home for a while till the body is ready. Was covered over with a few dust sheets, the old garage door can be closed and sealed off for when the spying starts. 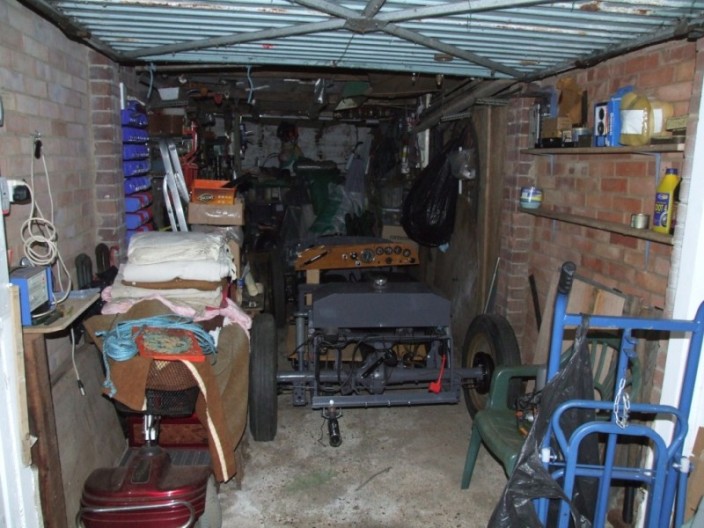 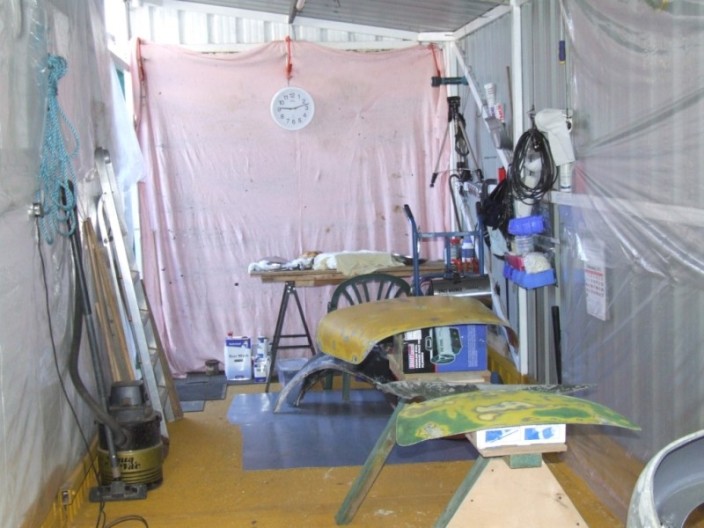 But that would be after a while of preparation. | |
|
| | |
Sponsored content
| | Subject: Re: My DLM rebuild (photo heavy) | |
| |
|
| | |
| | My DLM rebuild (photo heavy) | |
|